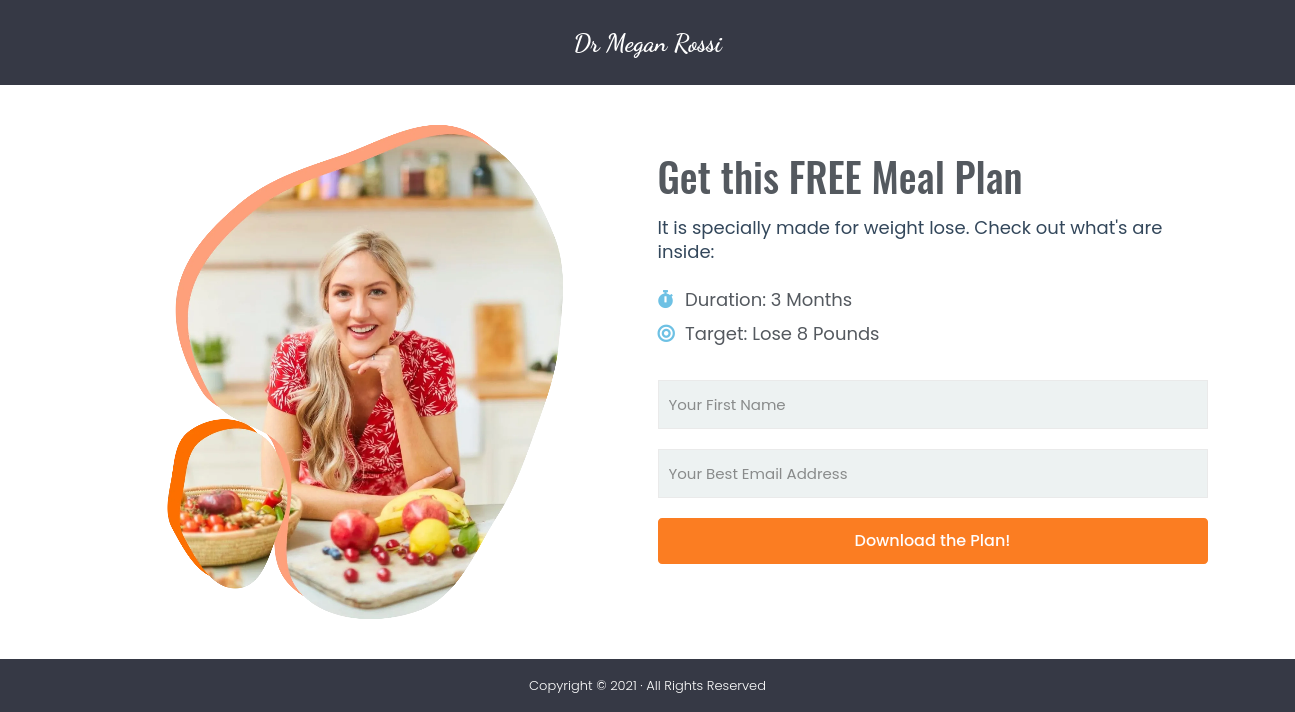
Today, in this blog post we are going to show you how to create a squeeze page in WordPress using Elementor and WPForms. In our previous post, we have told about 7 tools we use for creating sales funnel and landing page in WordPress. So, here in this post, you will see the practical use of two among those tools while creating the squeeze page.
Before getting started many of us may ask, what is a squeeze page?. For them, to answer, I will say according to Instapage.
A squeeze page is designed to squeeze a visitor’s email address from them by offering something valuable in return.
For example, Dr. Megan Rossi is a nutritionist and she helps people with diet plans. She has made a 3 monthly meal plan to lose 8 pounds. Now, she wants to create a page on her website to offer this plan to the visitor in exchange for their first name and email address.
I hope the example makes sense. So now, let’s do the actual work.
Creating a Squeeze Page in WordPress
We are going to create the page on the WordPress website. To do this job, you will require all of the following things:
A
A website that is running on WordPress content management system.
B
Elementor — a WordPress drag and drop page/ website builder plugin.
C
WPForms – a WordPress lead capture or contact form plugin.
Before heading to the first step you will need to install Elementor and WPForms plugins. If you do not know how to install plugins look at this tutorial,
Step 1: Create the Page and Design the Layout
In the first step, we start with logging into our WordPress website. We want to build a squeeze page for Dr. Megan Rossi. We create and develop pages on our subdomain and later transfer them to the client’s website.
Let’s login to our subdomain https://fiverr.rainastudio.com/
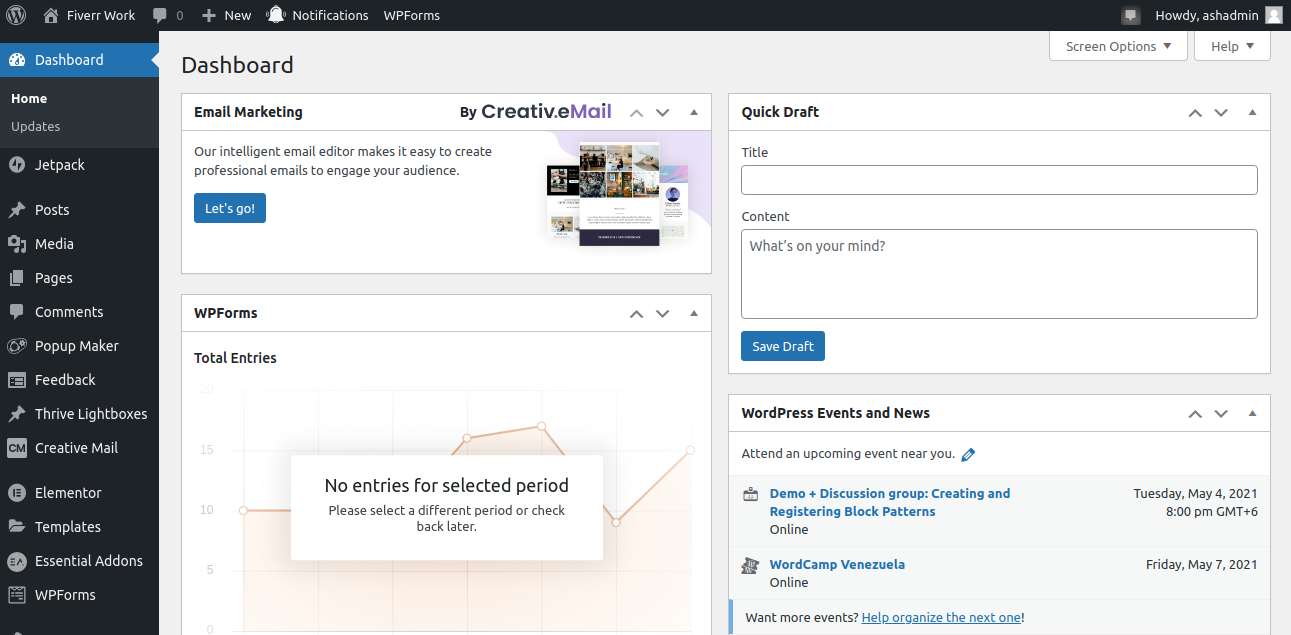
We are at our Dashboard on our subdomain.
RainaStudio Fiverr Subdomain Dashboard Screenshot
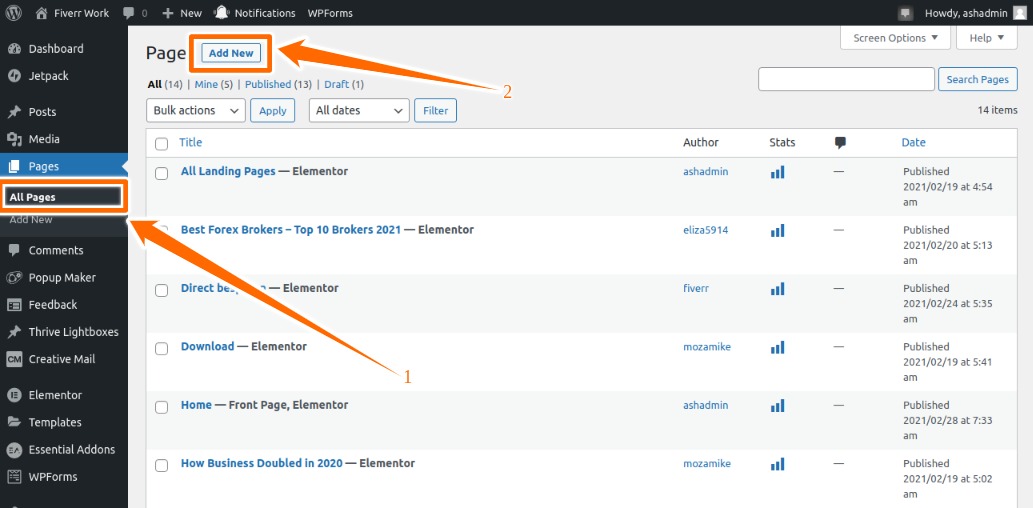
Go to and hover on the Pages menu and click on All Pages. You see a page like the following and there is a button called Add New click on this.
Go to All Pages and Create a Page
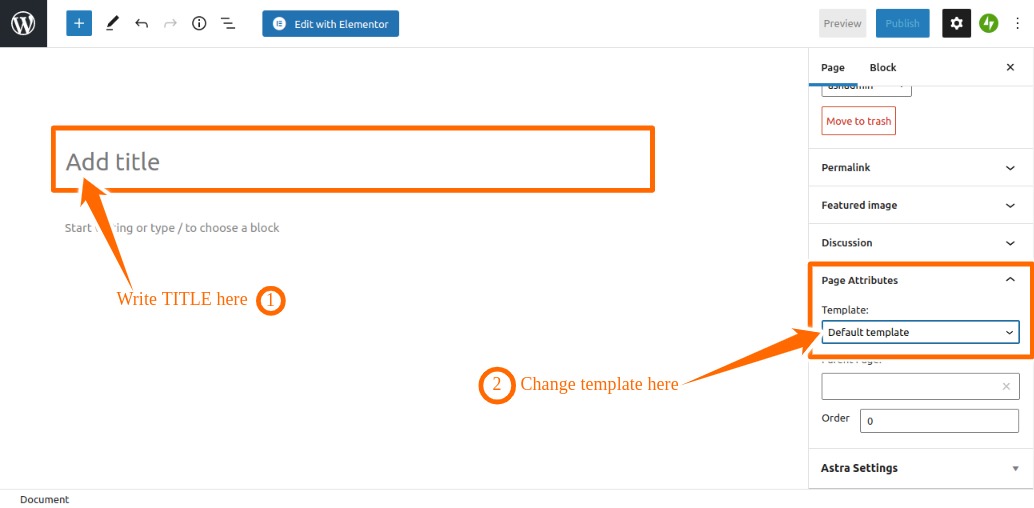
As so as you click on that button you will be direct to the next page that looks like the following. We will write a title for this page and change the page attributes template to Elementor Canvas.
Create Page and Change Template
Hit the Save draft to save the changes and finally click on Edit with Elementor to run the Elementor page builder on the page.
After clicking on that button you will be direct to a page that will look similar to the following screenshot.
Edit With Elementor Screenshot
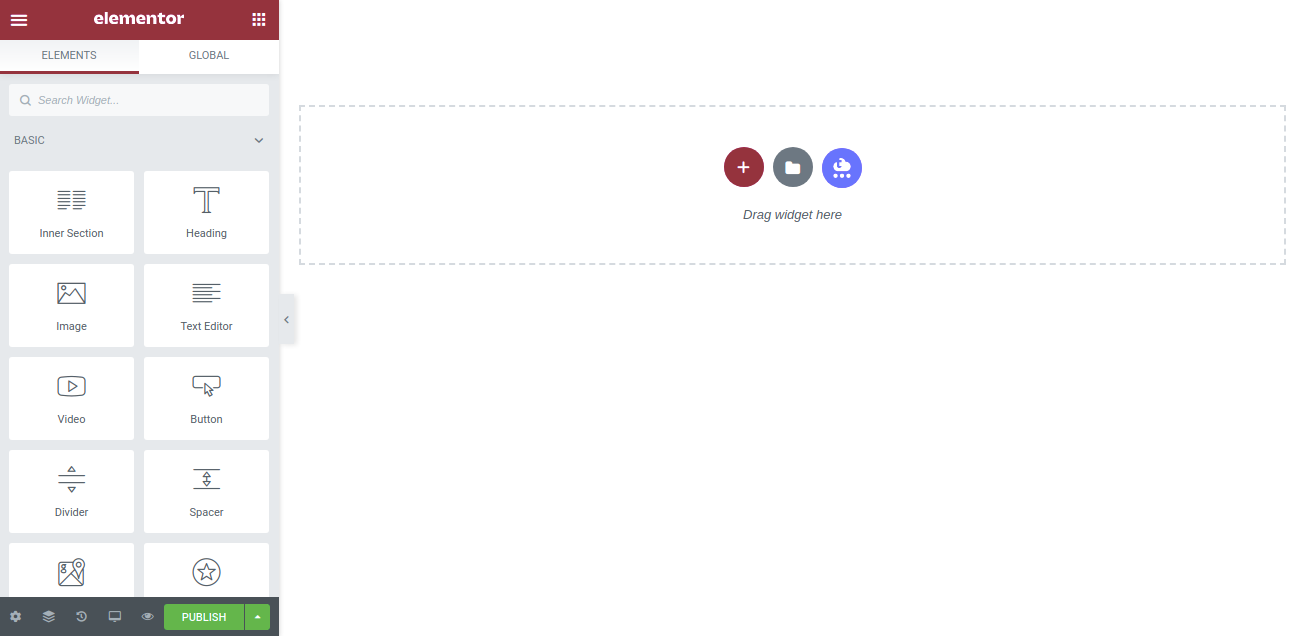
Add New Section to Elementor Canvas
It is a blank canvas! On this canvas, we will design our squeeze page.
Each web page has three base elements that are header, body, and footer. On this canvas, we will also add them one by one. So, let’s do the header first.
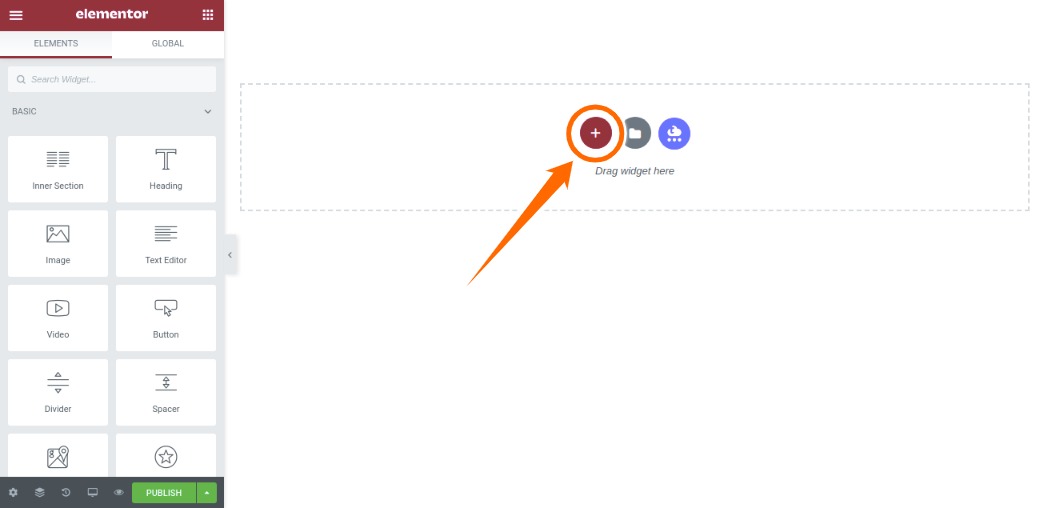
Add New Section in Elementor Canvas for Header
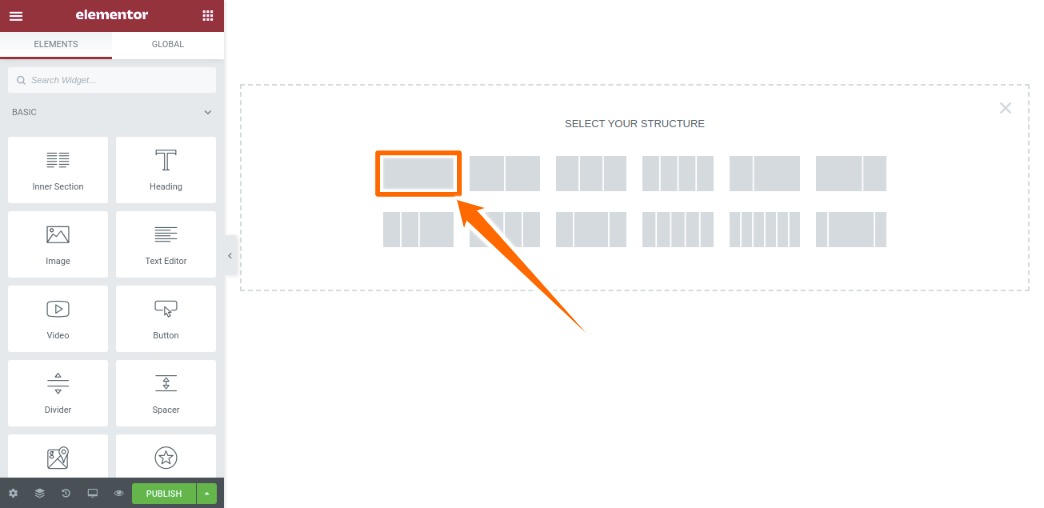
On click on the plus icon pointed on the above image an area will appear. Click on the first structure like the following screenshot.
Click on the first structure
We just added our header area. Now I will change the HTML tag and background color of this area as well as add her name as the site name/logo/brand name. So, let’s do it.
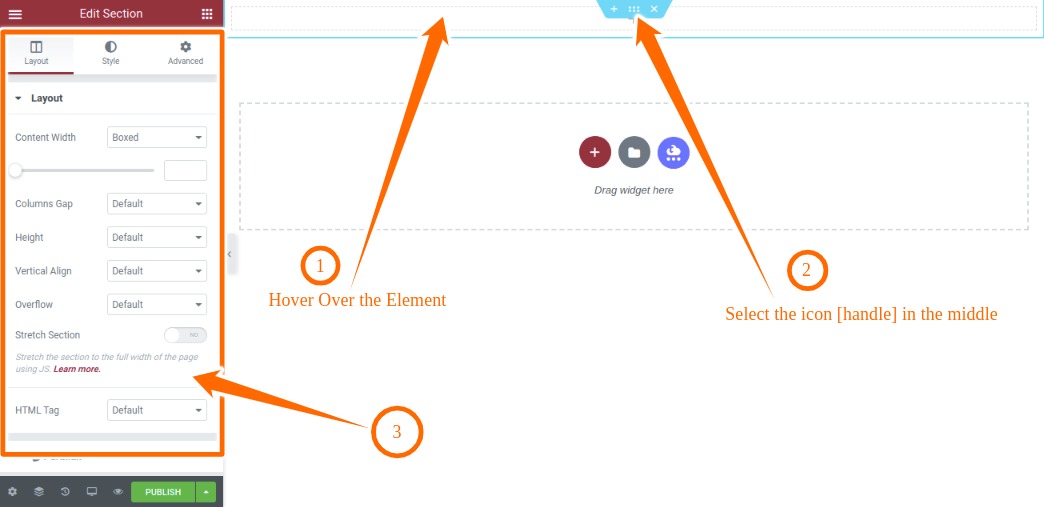
Hover over the added structure and click on the middle icon (handle icon). You will see all available options just open in a panel like the following screenshot.
Hover over the Added Structure
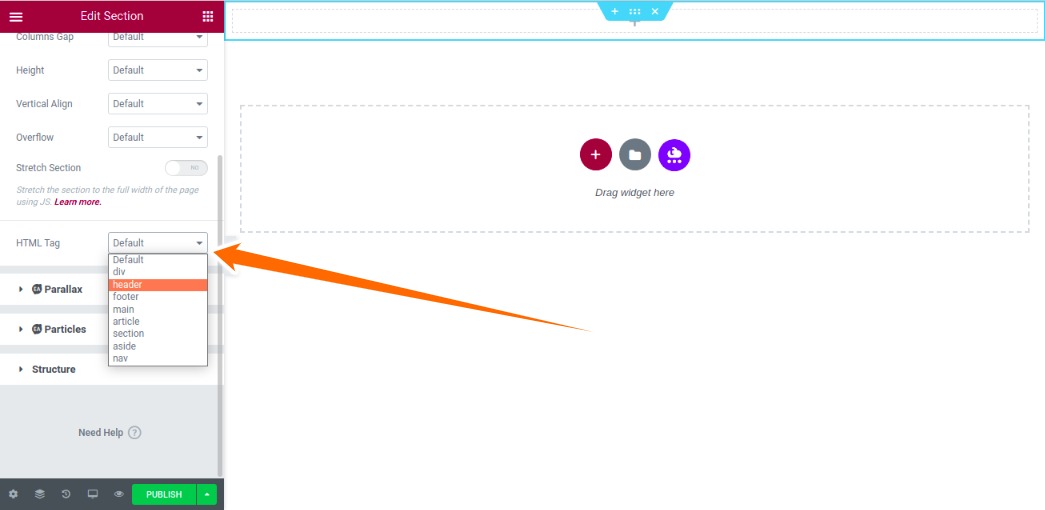
We will make changes through the options panel. At first, we change HTML Tag Default to the header.
Change HTML Tag to Header
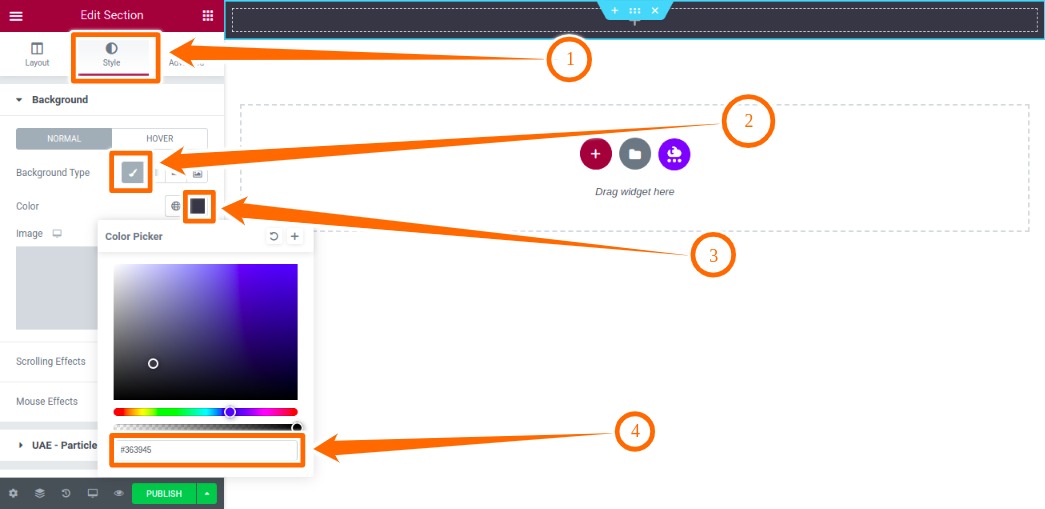
Now we change the background color of the header. To do this you need to click on the Style tab then in the Background section we select Background Type Classic. You see a Color picker has popped out. We click on it and paste our HEX color code. See the following attachment for details.
Change or Add Background Color
At this point, we want to add the name of the doctor into the header structure element. To do this, we will click on Widgets Panel Icon.
Widgets Panel Icon
Add Heading Widget to a Section
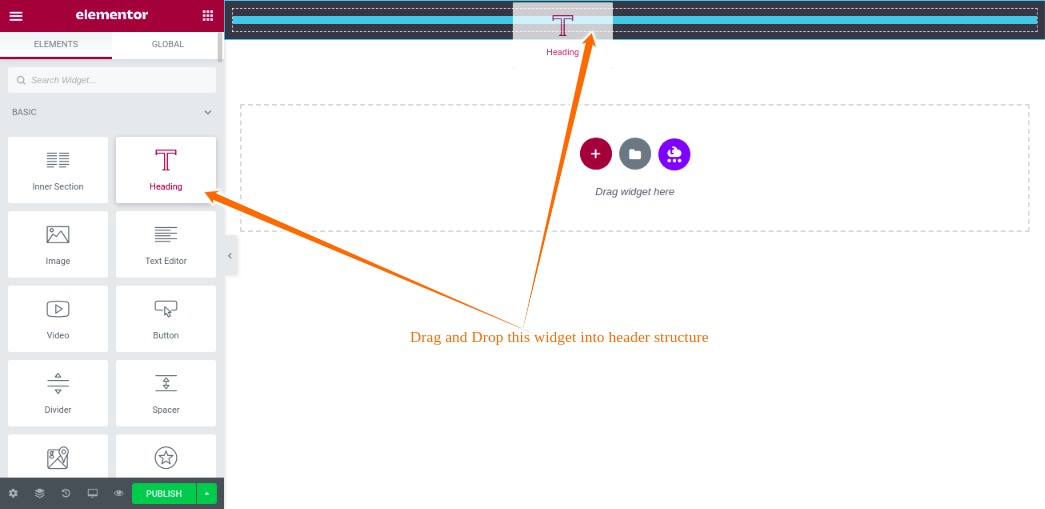
From the Widget panel drag and drop the heading widget into our header structure.
Drag and Drop This Heading Widget into Header Structure
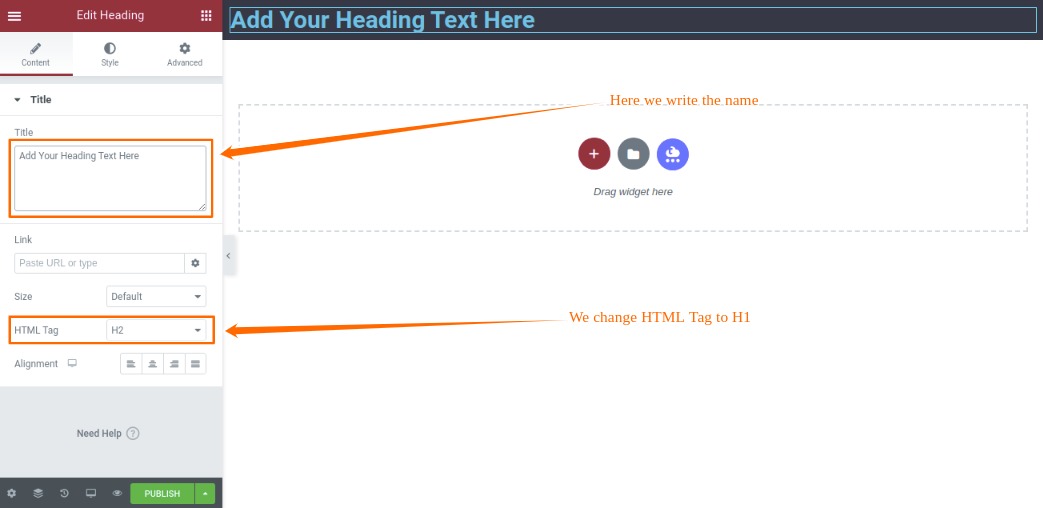
We write the name in the title field and change the HTML tag to H1. And from the Alignment option, we click on Center to align the name in middle.
Write Name and Change HTML Tag
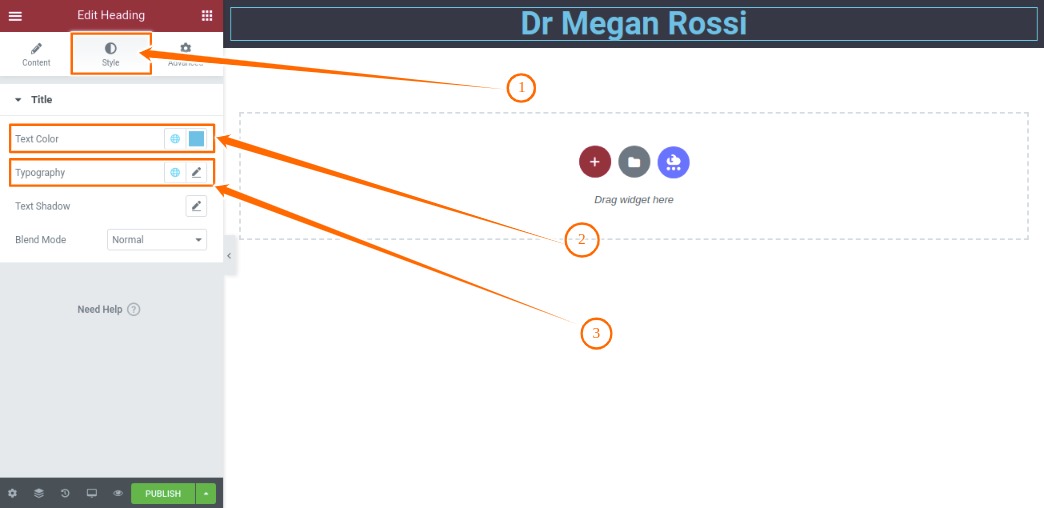
We go to the Style tab to change font color, font family, and font size. Check out the below screenshot to understand.
Click on the color picker from the Text Color option and set the color. We set white color for the text. From the Typography, you will see there are a bunch of options all related. So, here from the Family, we select Dancing Script as a font family. We set 25 pixels for font size. And bold as font-weight.
Change Font Color, Family and Size
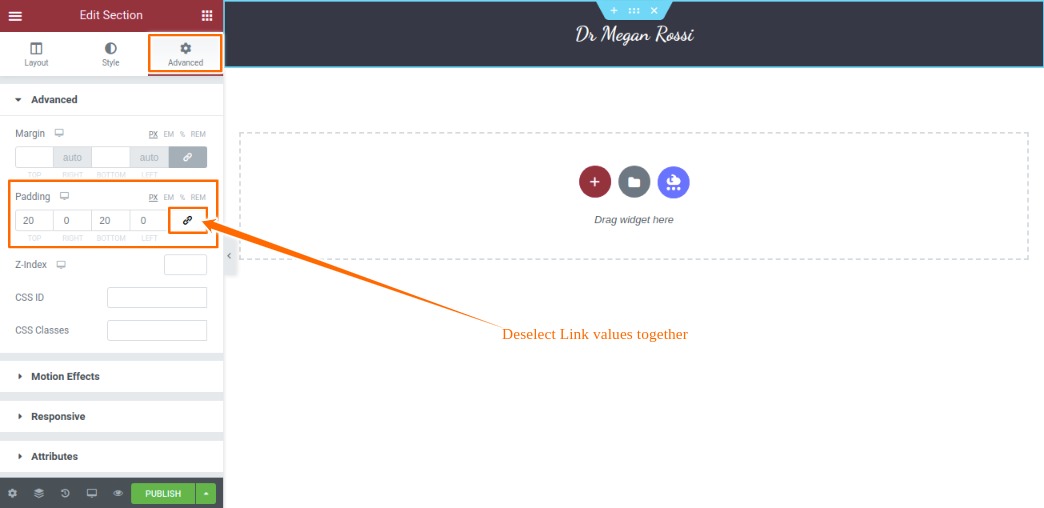
We need to add some padding at the top and the bottom of the header section. To do this again we need to hover over the section and click on the handle icon.
The options panel will slide out and from the Advanced tab, we will change the padding. There is a Link value together icon by default it is selected. We need to deselect and set 20 px padding for the top and 20 px padding for the bottom.
Add Padding to Header Section
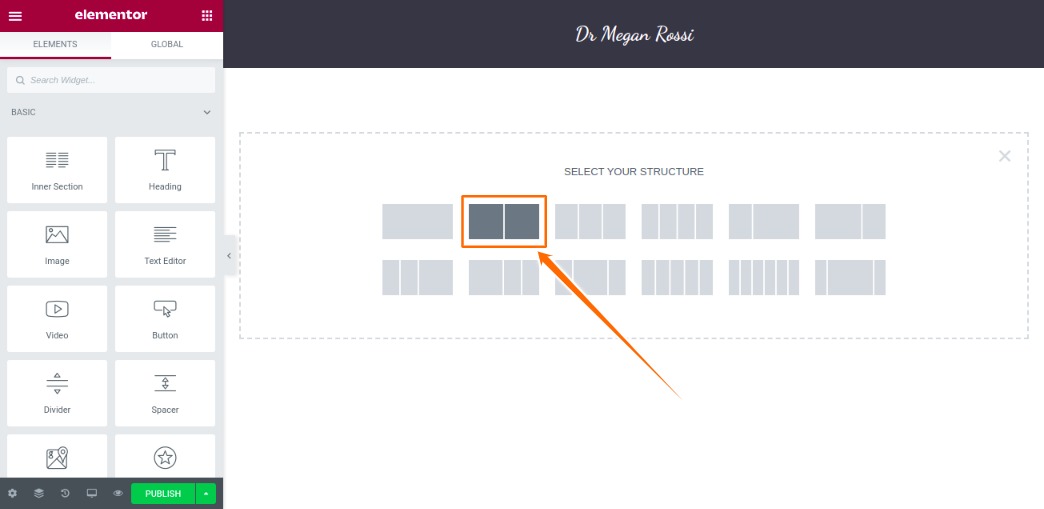
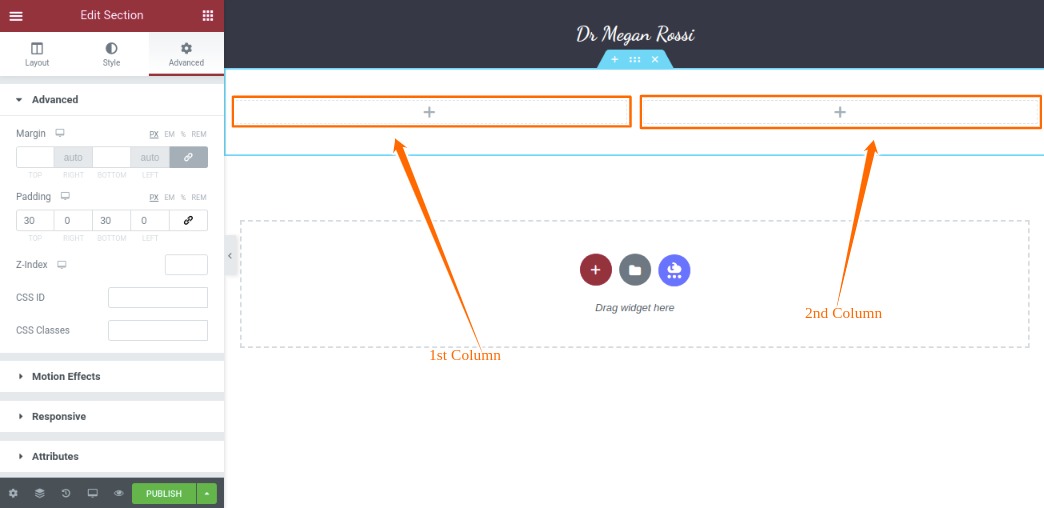
We have done our header. Now, let’s do the body section. Add a new section for the body. If you do not remember how to add a new section click here to see. In the first phase, we asked to click on the first structure like here.
But for this section, we will click on the second structure. See the screenshot below.
Select the Second Structure
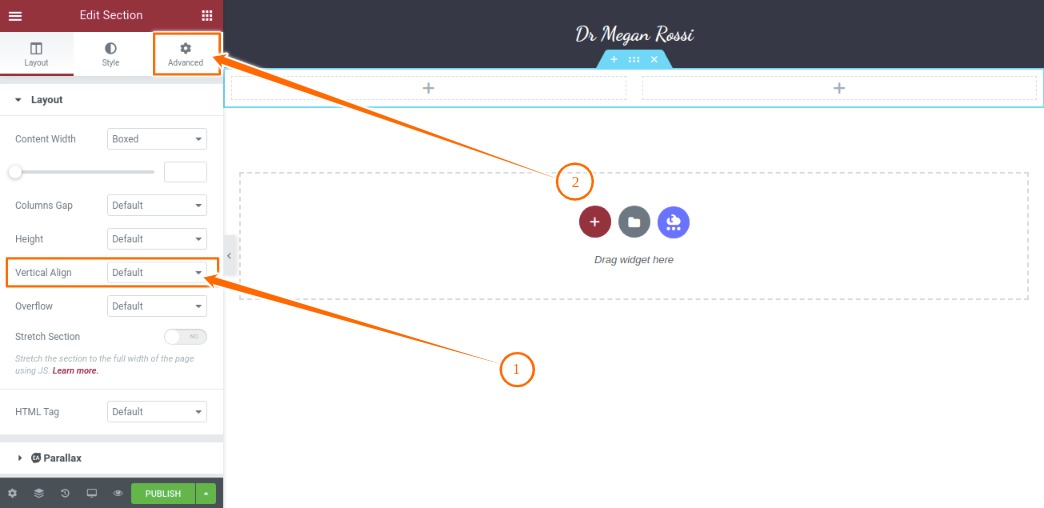
You see we have two columns structure. Let’s make some changes to this section. To do this, at the Layout options panel you Vertical Align change it to the middle.
Now go to the Advanced tab to add some padding at the top and bottom. Check this, if you want to see how to add padding.
We set 30-pixel padding for the top and bottom of this section.
Change Vertical Align and Padding
In the first column, we want to add an image widget to add an image and for the second column, we want to some text with the lead capture form.
Add Image Widget to Elementor Column Section
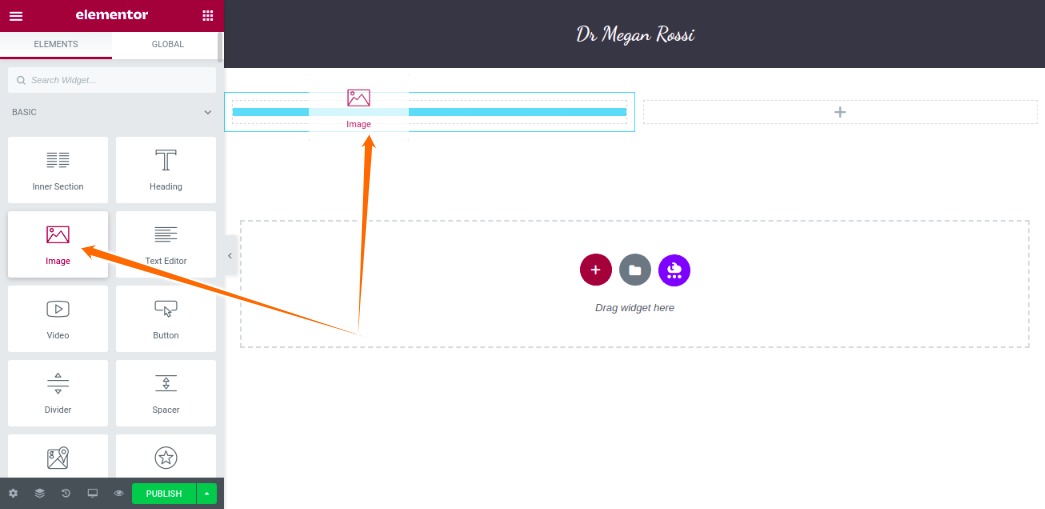
So to add an image widget to the first column click on Widgets Panel Icon like this. At the widget panel look for the Image widget and drag and drop it into the first column.
Drag and Drop Image Widget
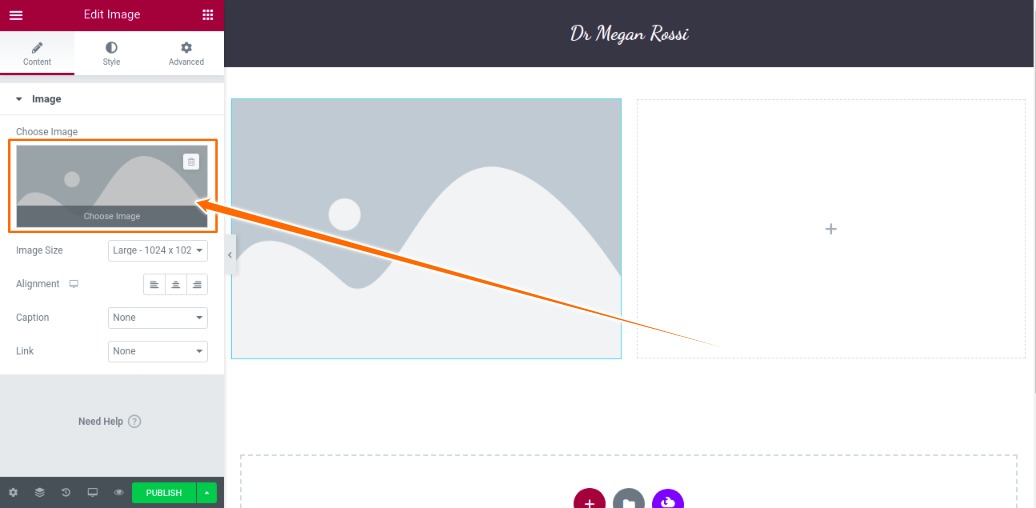
Now, we add an image to this widget. Hover over the Choose Image option or click on it the media library will be popped up. Upload the image and click on Insert Media. Later from the following Image Size option, you can set the image size to your needs.
Choose Image and Set Size
We just added the image now we add some text to the second column. Click on Widgets Panel Icon and drag & drop the Heading widget to the second column. Do this two times. Because on the first widget, we add the heading, and in the second widget, we add a description.
We have already know how to add a heading widget and write text for it, changing color, font family, and size from here.
So, here, for the title in the second column we set the text color to #54595F, Oswald as the font family, 40 px font size, and 500 font-weight.
For the second heading widget, we change HTML Tag to P and set #33475B as the text color, Poppins as the font family, 18 px font size, 400 font-weight, and 1.3 as the line-height. So far the following screenshot is how it is looking.
Two Columns Squeeze Page Screenshot
Add List Widget to Column Section
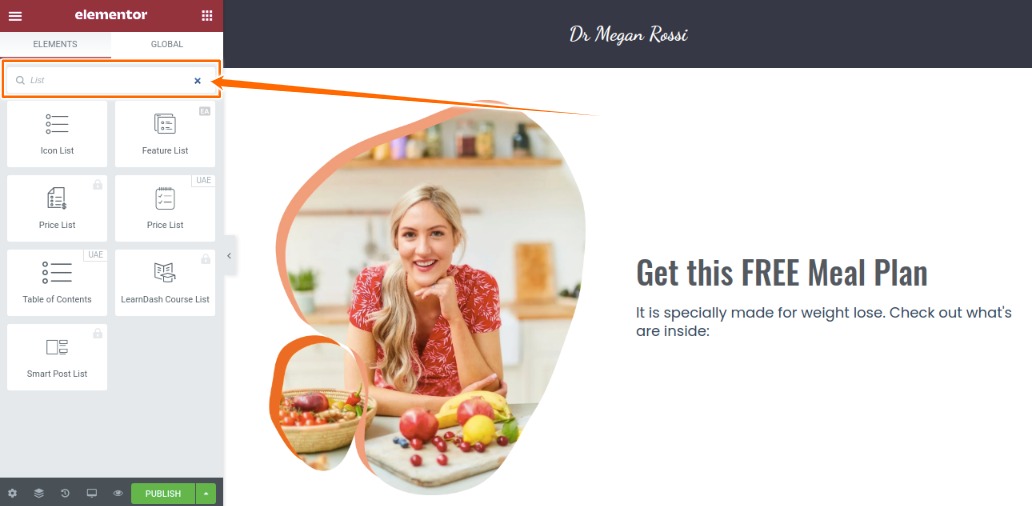
We want to add a list to the second column underneath the description. We click on the widget panel icon and in the search bar we write List. You see the Icon List widget just appeared.
Search for List Widget
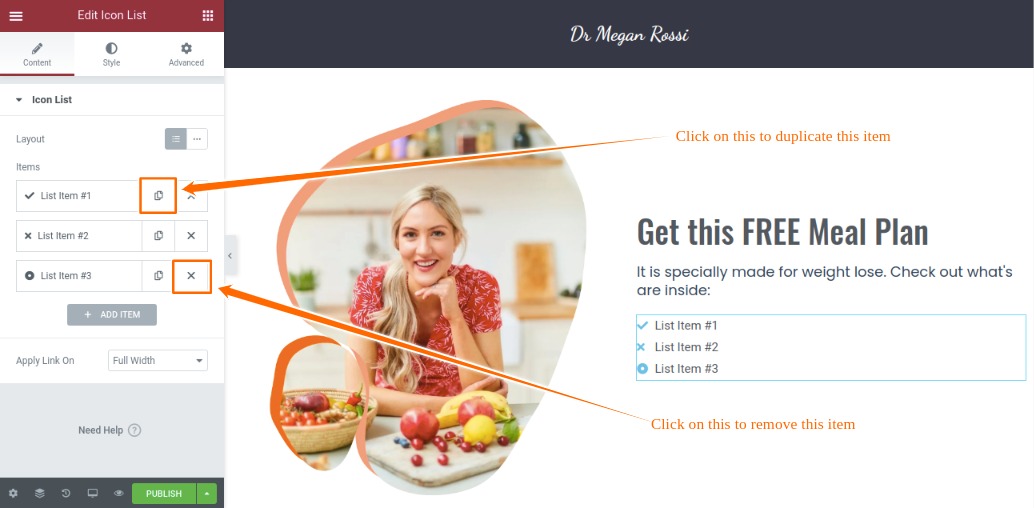
Drag and drop this widget under the description. You see the list just added with three items. We keep one and delete two of them.
Delete Two and Keep One List Item
We add the same font size, color, and font family for the list item as well. So to add item text and to change the icon we need to click on the list item. As soon as we click you see a text field and icon field appear.
For item name, we write in the text field, and to change icon we click on icon filed.
Change Item Name and Icon
To change font family, text color, icon color, and font size click on the Style tab. From the Icon option change icon color and size. And from the Text option change the typography.
Change List Item Icon Color and Item Typography
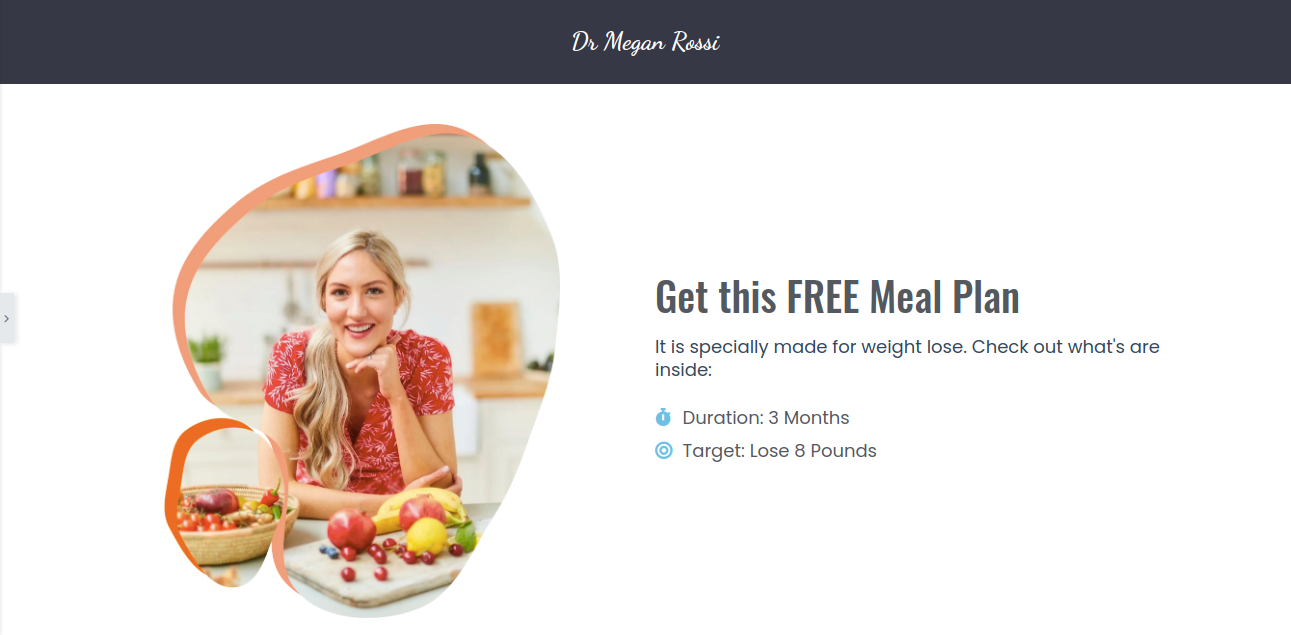
Now we duplicate this item and change the text and icon according to our needs for the second list item.
Page With List Items
Step 2: Create Lead Capture Form Using WPForms
At this step, we need to create a lead capture form using WPForms. To do this we need to visit our website Dashboard in a new tab.
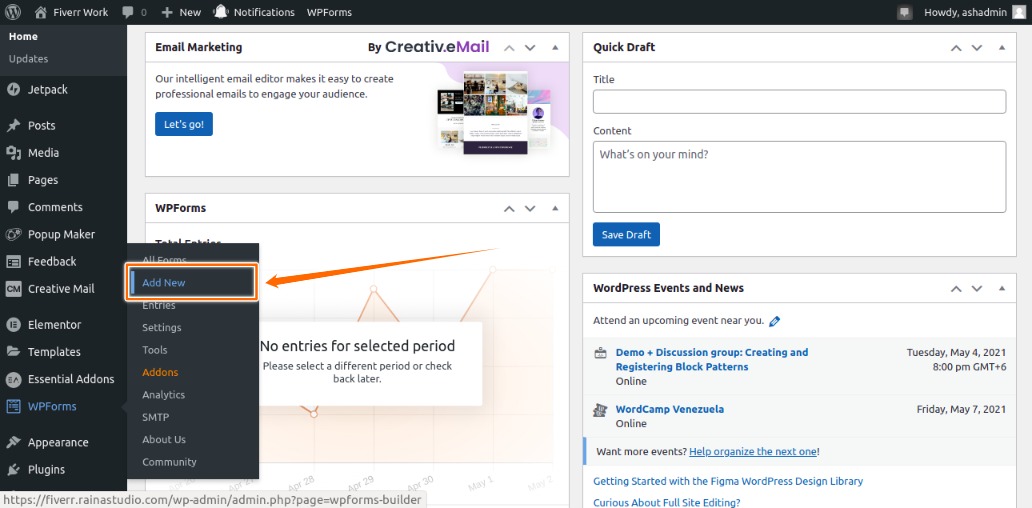
From there we look for WPForms in the Dashboard menu. There is an Add New sub-menu item under WPForms click on that to create our first lead capture form.
WPForms — Add New Sub Menu Item
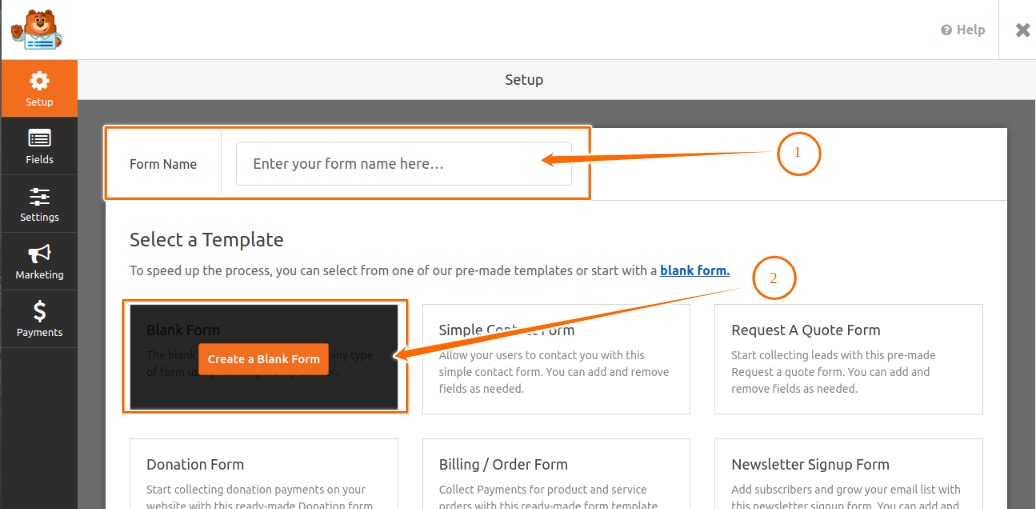
As soon as we hit the add new button we will be directed to the following page. Here in the Form Name field we type our form name and click on the Create a Blank Form button.
Create a Blank Form
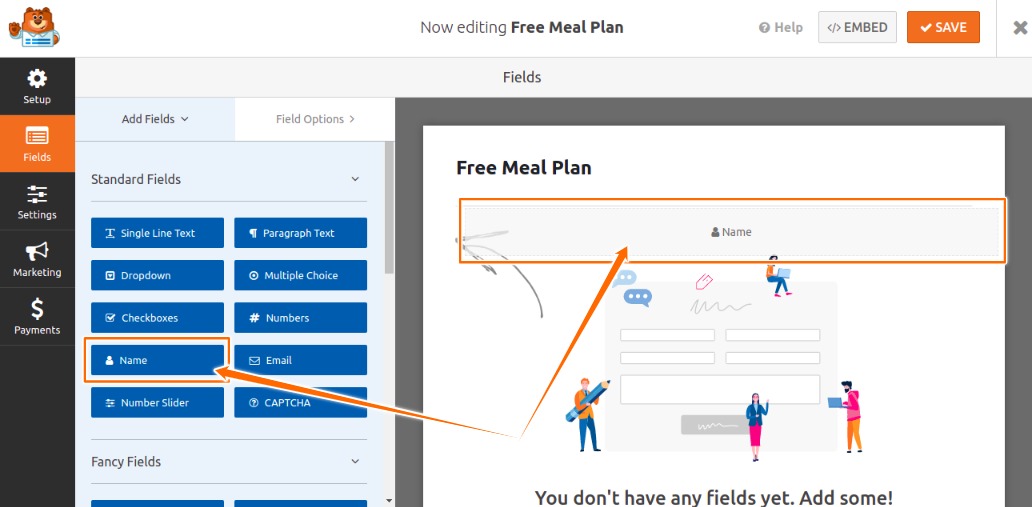
We are on a new page now as the following screenshot. We drag and drop any field from the left panel to the right fields adding area.
We need Name and Email fields for lead capture. So we add them.
Drag and Drop Any Field
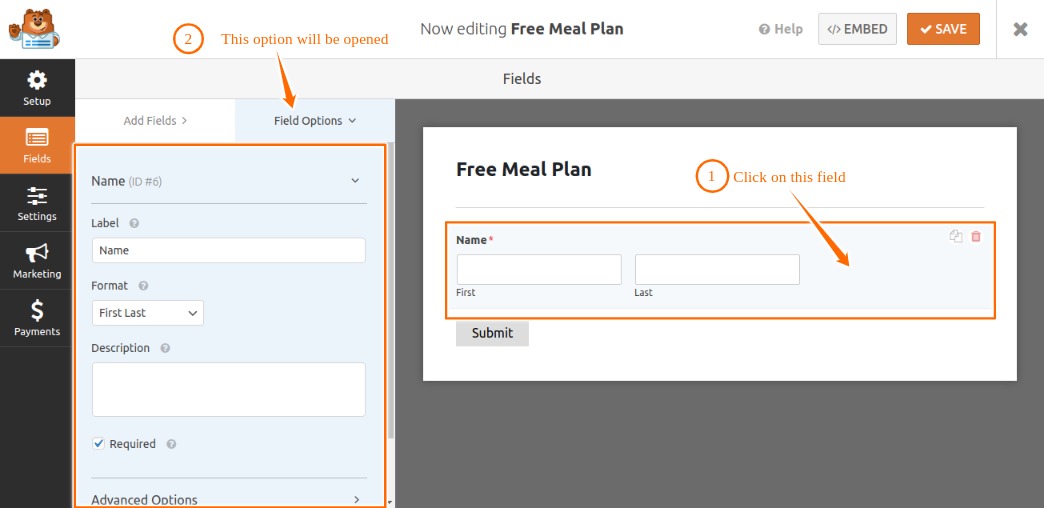
Click on the Name field or drag and drop to the right area. Now to change the label and style of this field we need to click on that field in the right area.
So, under the Filed Options tab we change our label name at the Label field. And at the Format we select simple.
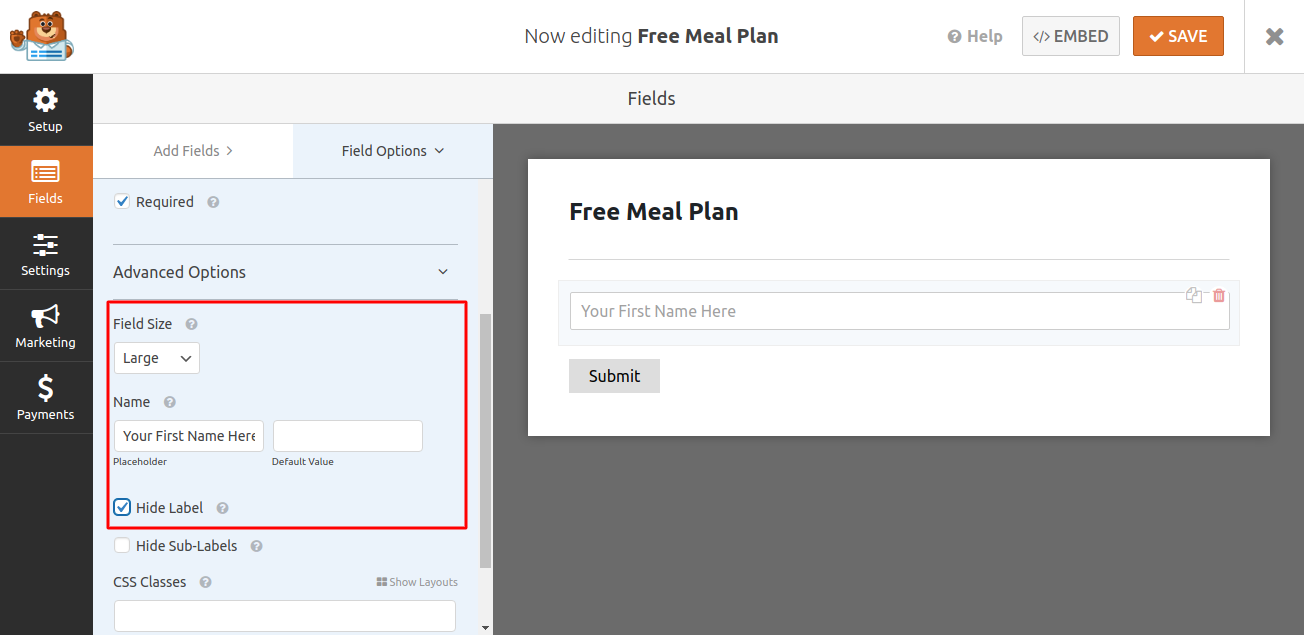
From the Advanced Options, we change input field size medium to large at Field Size.
Click on Field Item to Change Style
At the placeholder field, we type the text for the name placeholder and check on the Hide Label checkbox.
Field Advanced Options
We do the same for the Email field but for this, we type “Your Best Email Address”.
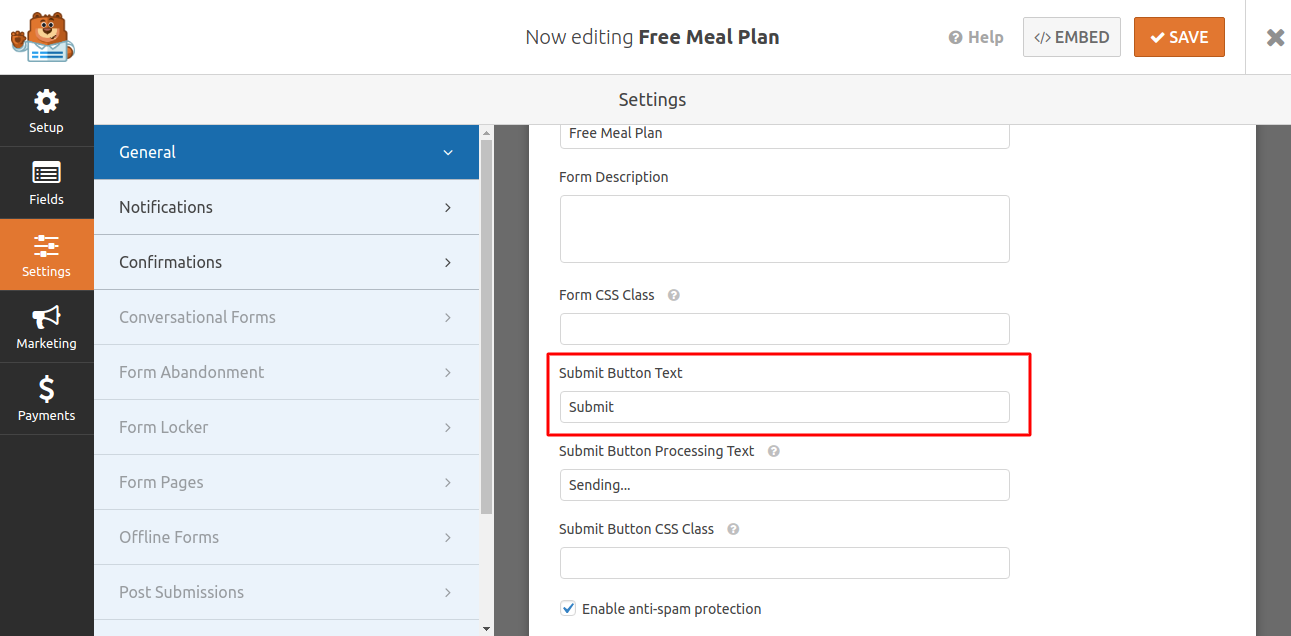
We want to change the text of the submit button to do this click on it.
You see an option field has appeared at the settings area to change the text of the button.
Change Submit Button Text
Now we get back to our Elementor page. We need to refresh this page but before doing it save the changes we have done.
Click on the arrow icon beside the green publish icon and hit the save draft option from there and then refresh the page.
Click on this Icon to Open the Save Draft Option
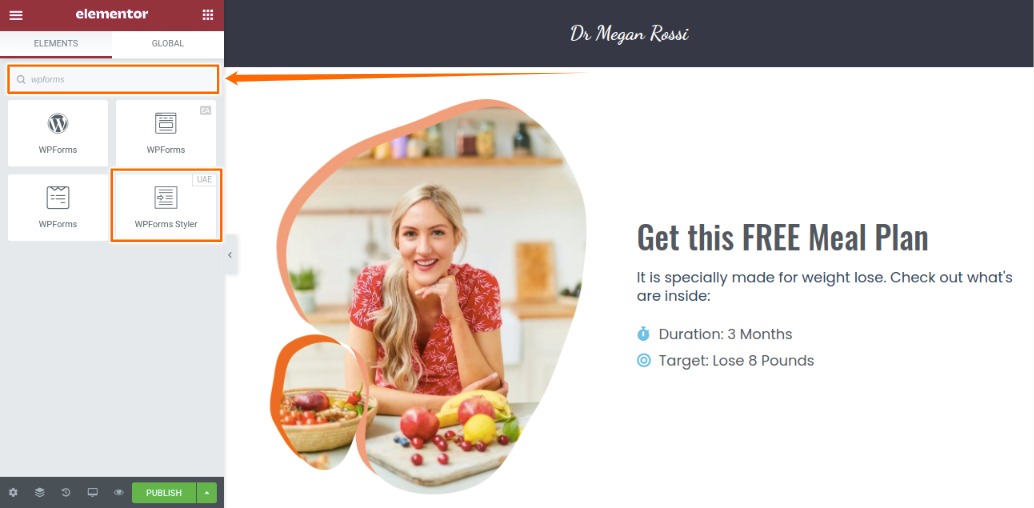
Add WPForms Widget to Elementor Section
After refreshing the page search for the WPForms widget. You will there are one or several widgets. We use WPForms Styler.
Drag and drop this widget in the second column under the list item.
Add WPForms Styler Widget
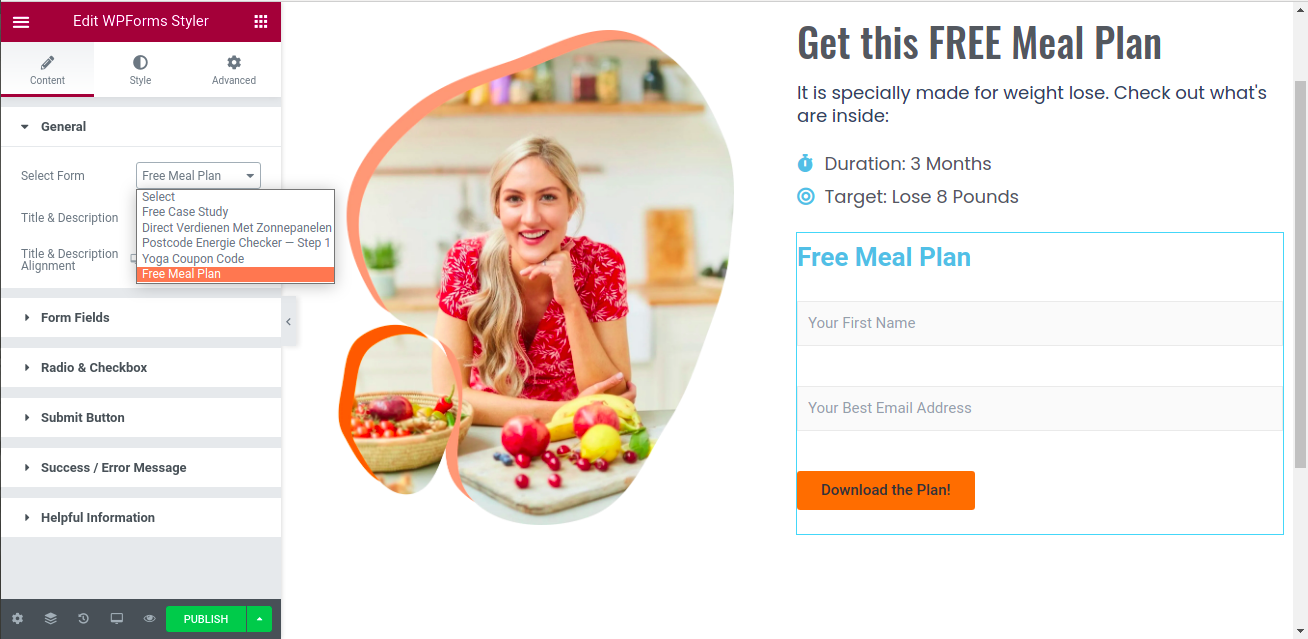
From the General area select the form we have created for this squeeze landing page. Select none for Title & Description option.
Select Form Options
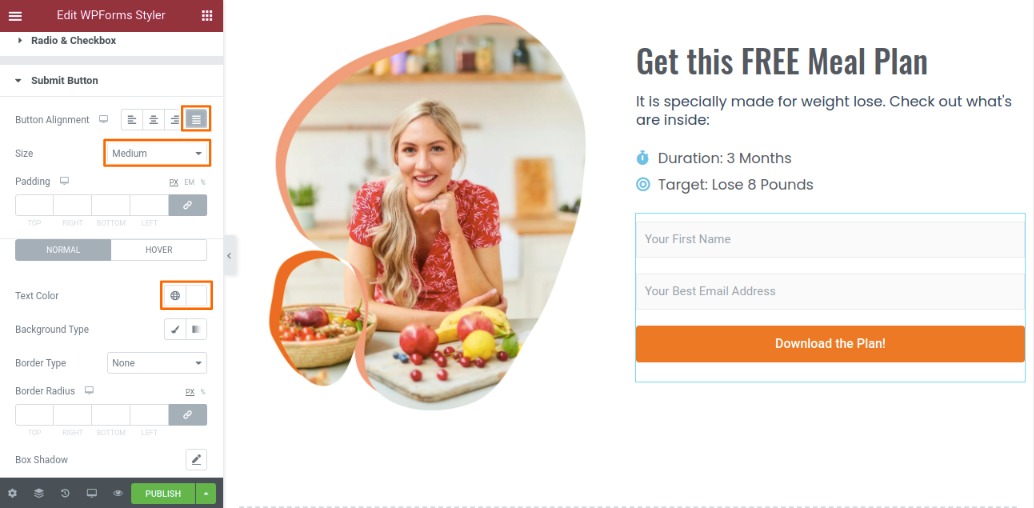
Change small to medium for button size and that is located at Submit Button area. Select justified for the button alignment. And text color to white for the button.
Change Button Color and Alignment
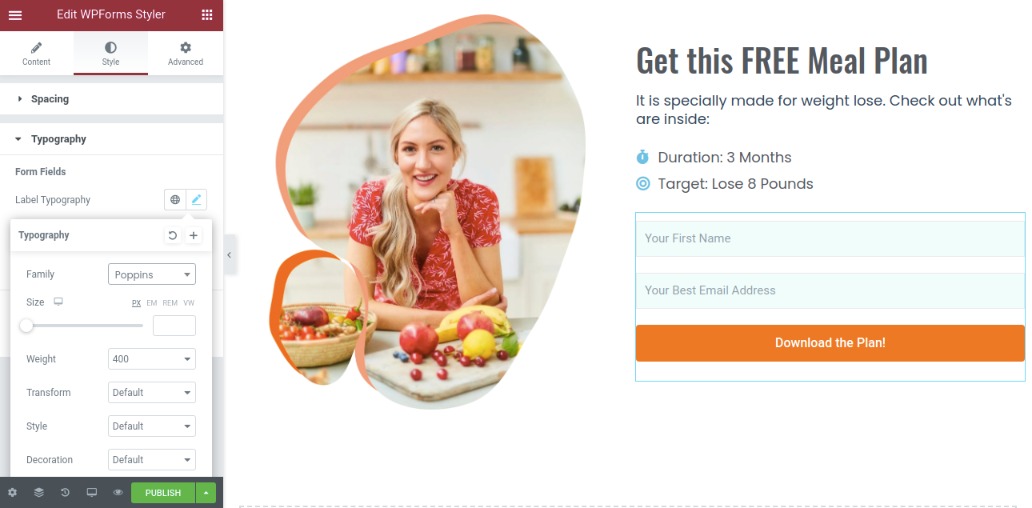
Now from the style tab, we change the font family to Poppins for all items in the Typography area.
Change Font Family to Poppins for all Typography
Step 3: Create the Footer Section
We, now, create the footer section. To do this we need to do the same as we already did here for the header.
The only changes here are to change the HTML tag to the footer. Same background color we have set for the header. But no padding.
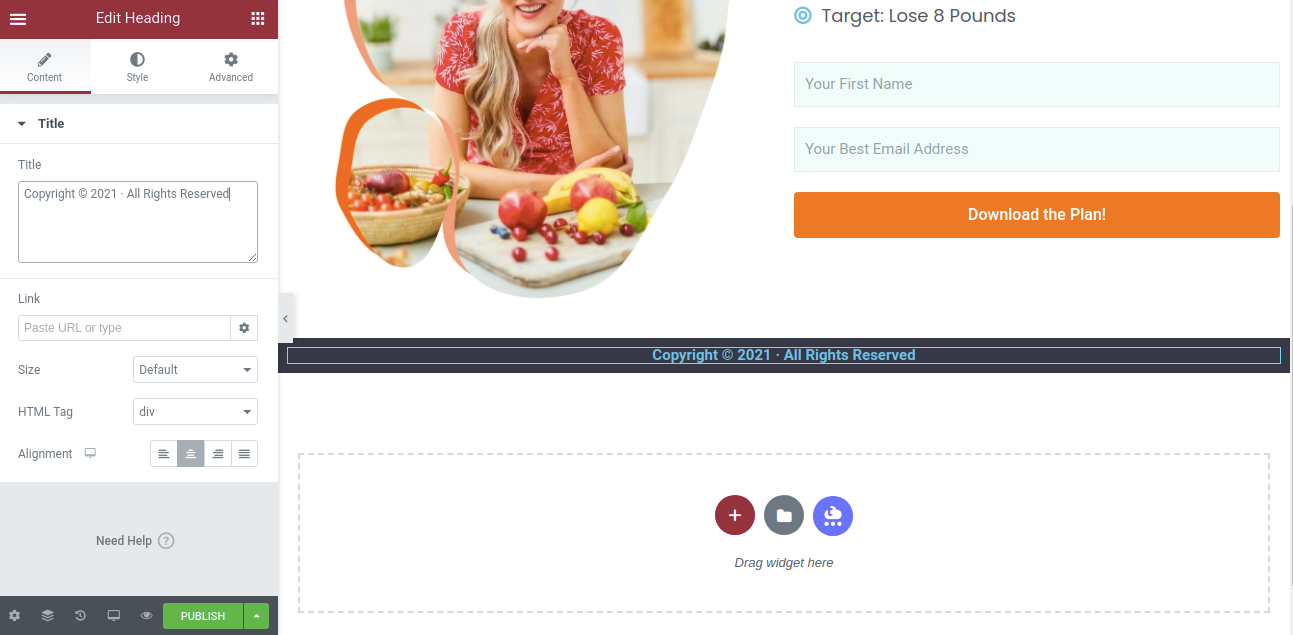
Add a heading widget into the footer section. Write something similar like “Copyright © 2021 · All Rights Reserved” change HTML tag to div.
Change HTML Tag to Div for Footer Copyright Text
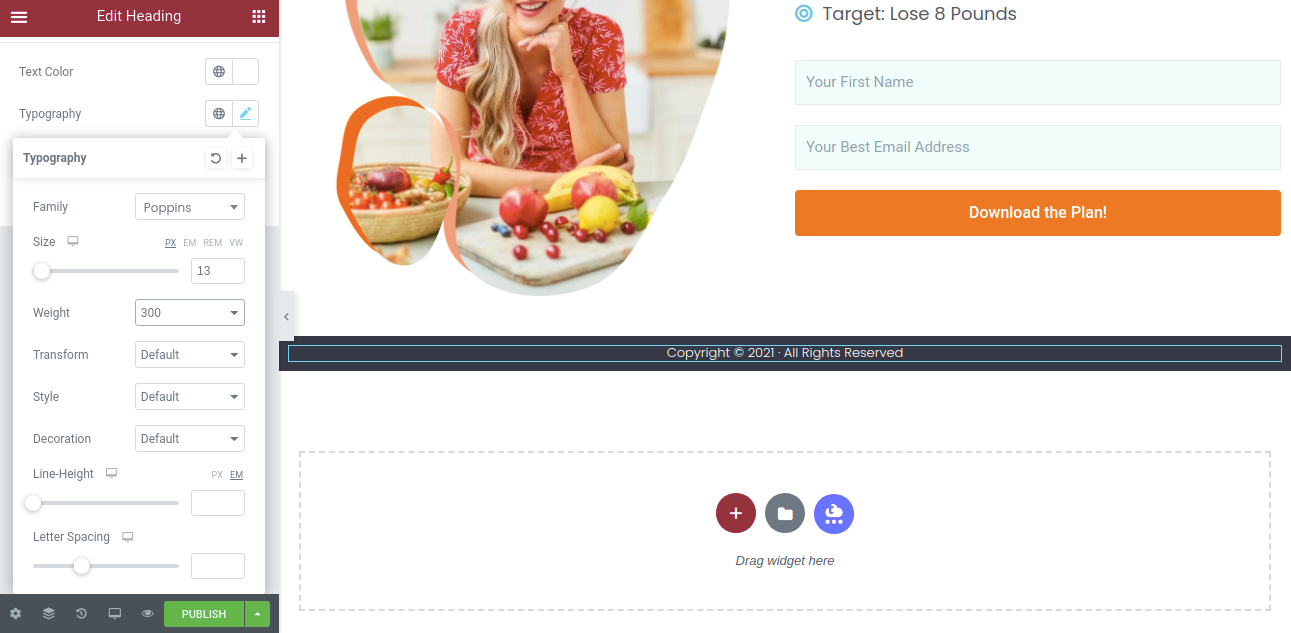
From the Style tab, we change the text color to white. Font family to Poppins, font size 13 and font-weight 300.
Footer Typography
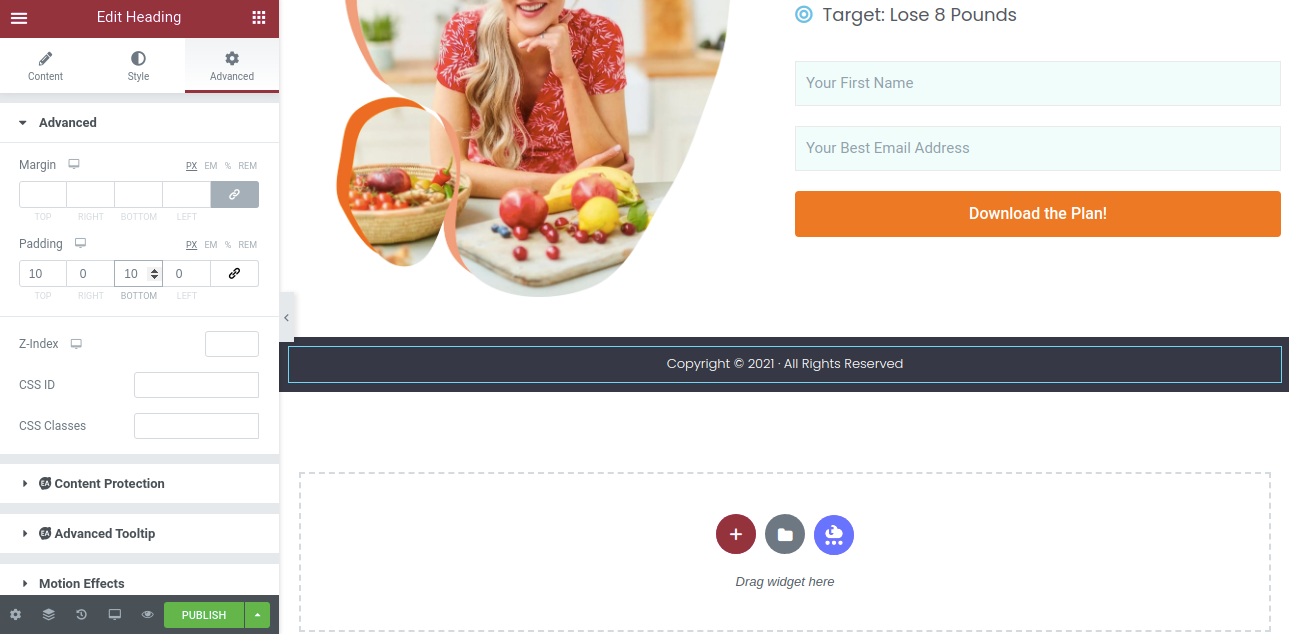
Add 10-pixel padding at the top and bottom for copyright text. Click on the Advanced tab and deselect Link values Together and inter padding.
Add Padding to Copyright Text
Hit the PUBLISH button to make the page live.
We are at the end of this post. Let us know if you have any questions about this post. I would like to know how do you build your squeeze page in WordPress.
Comment below if you find any difficulty while making your squeeze page. Do you create a thank you page for the squeeze page or not?
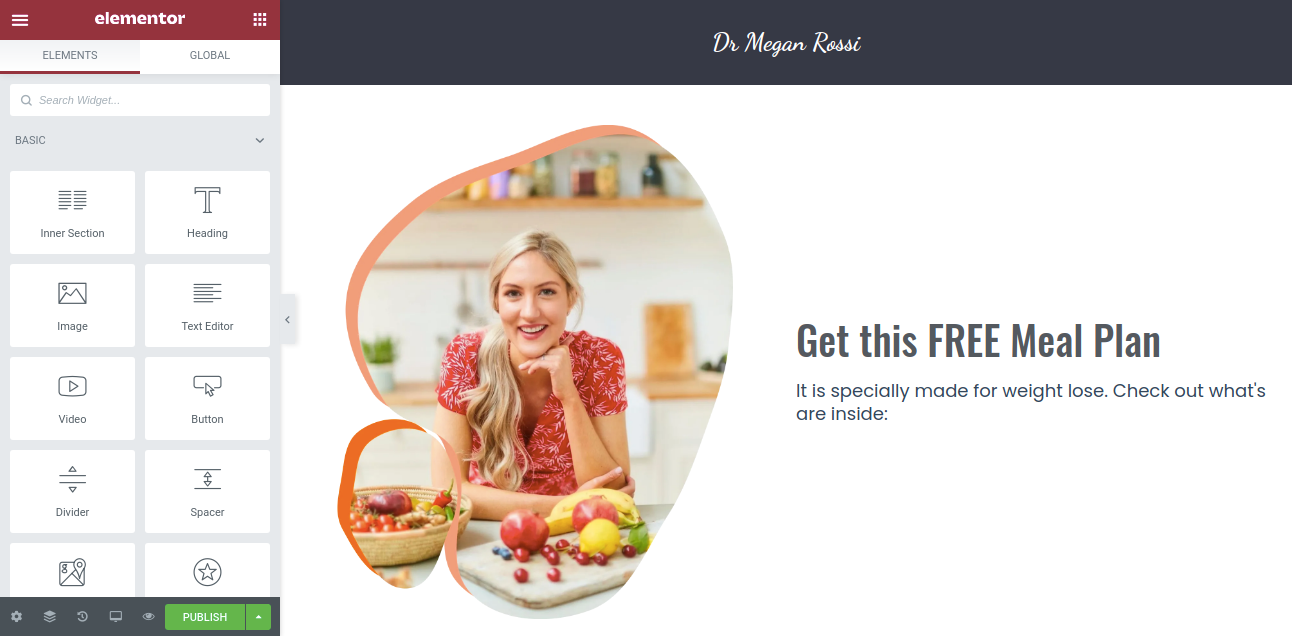
The following is the screenshot of our full SQUEEZE landing page.
Screenshot – Get FREE Meal Plan
