

Online shopping is getting popular day by day, that’s why those people who have products are getting more interested in building an eCommerce Website to sell their products more efficiently.
On this point, when you’re thinking about to start an Online Shop, then you need to know the way to build your own eCommerce Shopping Website. Isn’t it?
So, stay with me because here I’m going to share the easiest way to build an eCommerce Website using WooCommerce.
Before going further you can also check 25 highly effective ways to market your product on the internet.
Let’s Build Your Own eCommerce Website
First, you need to be sure about the Online Platform where you want to build your eCommerce Website.
Here, we’re talking about WordPress platform to build an eCommerce Business website.
At the starting, I always prefer WordPress instead of other eCommerce platforms like Shopify or BigCommerce. If you want to use any of those platforms, then you need to pay a monthly transaction fee.
On the other hand, WordPress is completely free and opensource, where you can easily build your own eCommerce website using the WooCommerce plugin.
So, now let’s move on.

Getting a Domain Name, Web Hosting, and an SSL Certificate
If you’ve already got a WordPress website it’ll be a short run, but if it’s not then it’ll be more than short.
First, you need to get a suited Domain name for your eCommerce Website and a Web Hosting for the presence of your website online.
There are many hosting providers are available, and they offer different types of hosting packages.
But, my recommendation is Bluehost (one of the most popular web hosting providers), which offers a promotional $2.95/month shared hosting plan.
I think it’s better to start a new website, however you can upgrade the plan when you need to speed up your site more.
It lets you include your domain name while you’re purchasing this hosting plan, so you don’t need to be bothered with purchasing it separately. As well as, it also offers 1-click WordPress installation.
 So, if you’re going to the mentioned Bluehost hosting, then just select WordPress as you’re going through setup, enter your domain name and you’re done!
Now, SSL Certificate (a secure sockets layer). Since you are creating an eCommerce online store, then it’s very important to purchase an SSL certificate.
Check the benefits of SSL certificate.
SSL is what your website uses to establish a secure link between your server and the customer’s browser which is reflected in your URL as “https://” (often will display with a green lock symbol too).
Fortunately, SSL is fairly easy to setup with Bluehost, it has a premium add-on during checkout when signing for hosting.
So, now your website is ready to transform into an eCommerce website.
Installing WooCommerce with Quick Setup
So, while it’s ready, then you need to setup eCommerce functions on your WordPress website.
For this, my recommendation is the free, most popular and powerful WooCommerce eCommerce plugin (which is also now maintained by the same people who started WordPress).
It’s easy to use and allows you create the most common component – product pages, shopping cart, and a payment gateway of your eCommerce website. It also compatible with contact from 7 and MailChimp.
As well as, there is a wide variety of optional premium add-ons and extensions that you can purchase to add more functionality to your eCommerce Website.
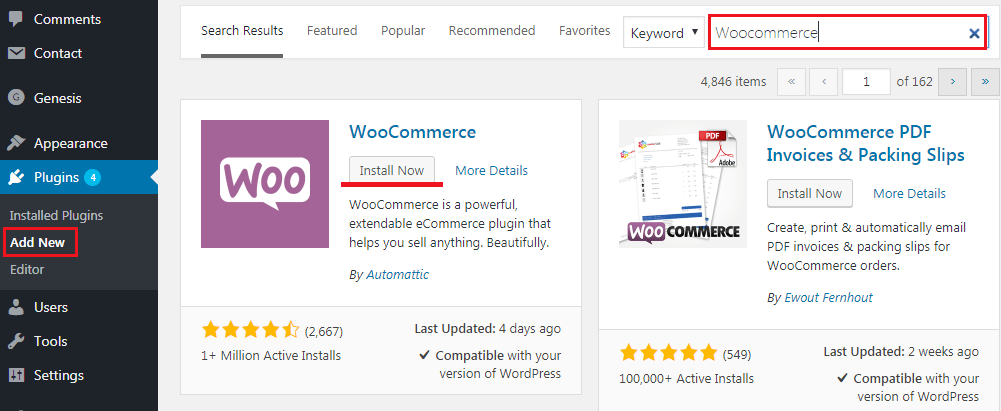
So, login to your Website Dashboard and simply install the WooCommerce plugin by clicking the ‘Add New’ of Plugin section (check left side).
You’ll find a new tab with available plugins for installing, now search for the plugin from the search bar, then click to install and activate it.
Do you want to create a food shop eCommerce website? Yes! Well, check out best WordPress themes for food shop website.
Once you click the activate button, then you need to do some quick setup through the activation process. Here, below the process are –
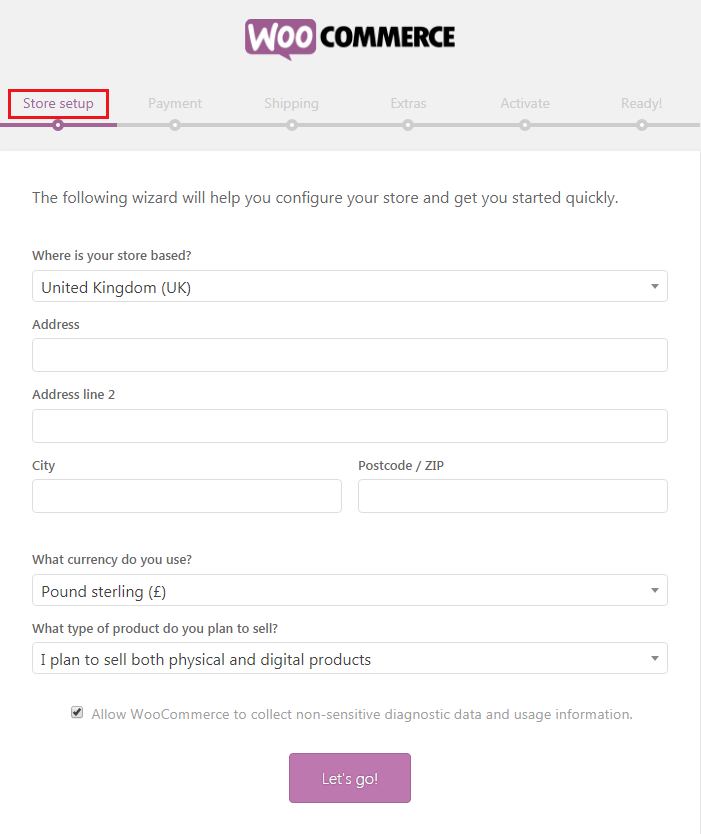
At first, you need to setup your store location, currency format and types of product. It’s important to make it clear so your customers know how much you’re charging and what they are getting for their money.
So, fill up the boxes with the required information and let’s go!
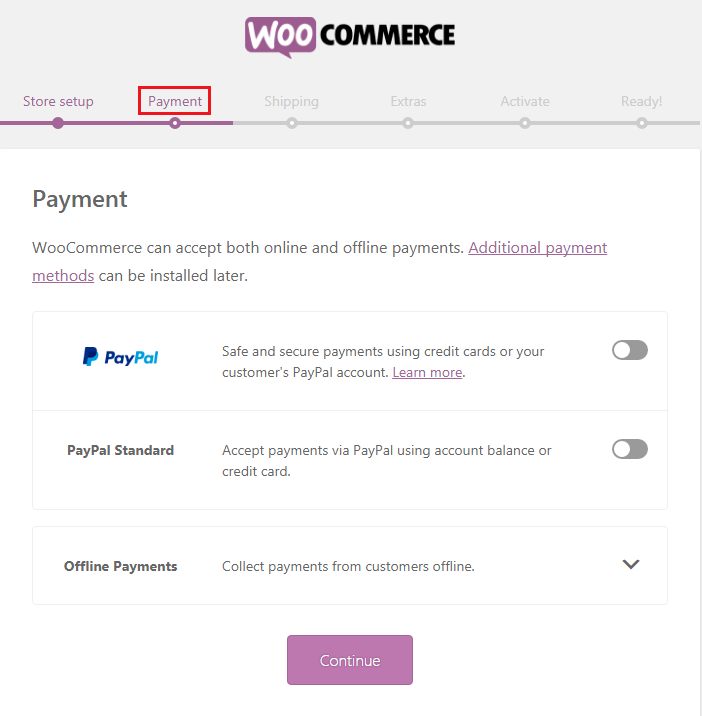
The next tab about ‘Payment’ where you need to select a payment method, WooCommerce can accept both online and offline payments. Offline payments methods are via check, bank transfer or cash on delivery.
On the screen, you’ll see default options are Paypal and Paypal Standard because Paypal is one of the easiest options to get online payment for goods (however, there are some PayPal alternatives that you can use as custom).
So, select the payment option as you want and click ‘Continue’
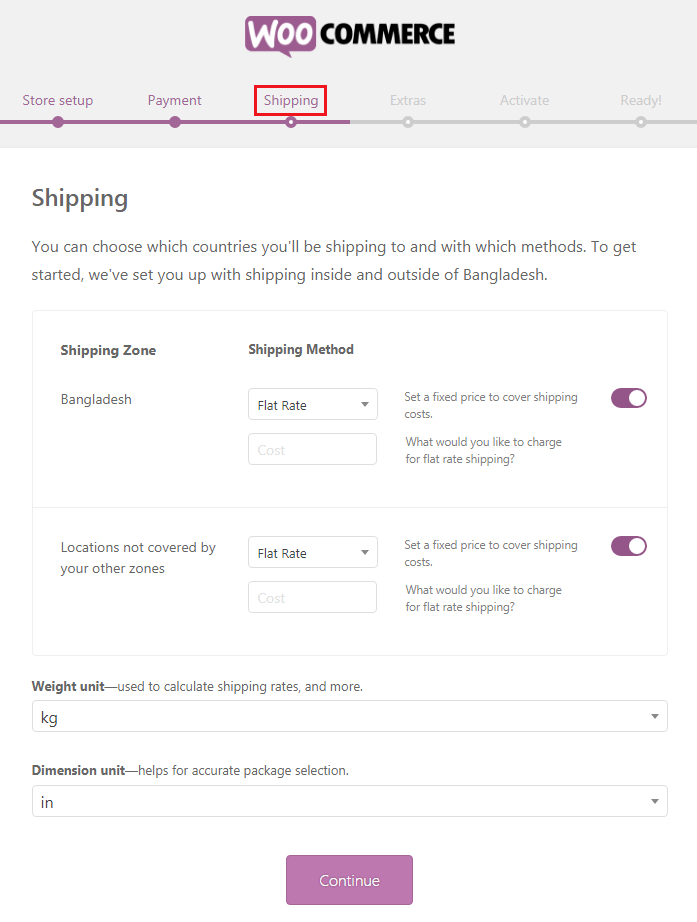
On the ‘Shipping’ tab, you have to choose which countries you’ll be shipping to and with which method.
If you want to sell digital products like Ebooks, then you don’t need to do anything here. Simply click ‘Continue’ to go to the next tab.
But, if you want to sell any physical products like Smartphones, or T-Shirts, then you’ve to define shipping cost by location and the product’s Weight unit and Dimension.
Going to create a apparel online shop, here are best WordPress themes for clothing store will fit your website.
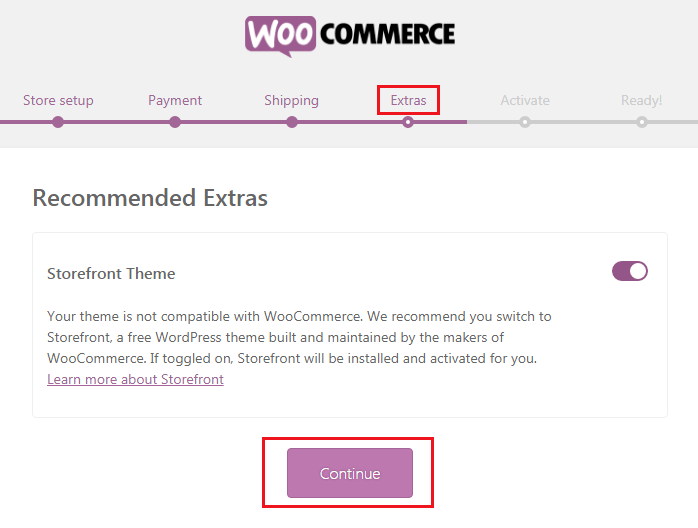
Then, ‘Extras’. This tab is actually for setting a theme, here you can see the default theme is Storefront – a free WooCommerce compatible WordPress theme built and maintained by WooCommerce Team.
Here, my recommendation is to keep it when you’re building completely a new eCommerce website.
But, if you want to use any other theme or already have installed one, then switch off the option of Storefront installation, and click the Continue button.

Now, on the next tab, you can get the option to connect your Jetpack plugin to WooCommerce.
If you already have Jetpack installed on your site, then you should connect WooCommerce with Jetpack.
But, if you don’t want to connect Jetpack right now, then click the button ‘Skip this step’.
Jetpack is very powerful with a lot of features which most of the WordPress users use. It will secure your site from unauthorized access or spam.
As well as, allow you to see your site stats, including total sales, top products, and much more.
Whether it’s about business then you should also add a firewall to extend the security of your site.
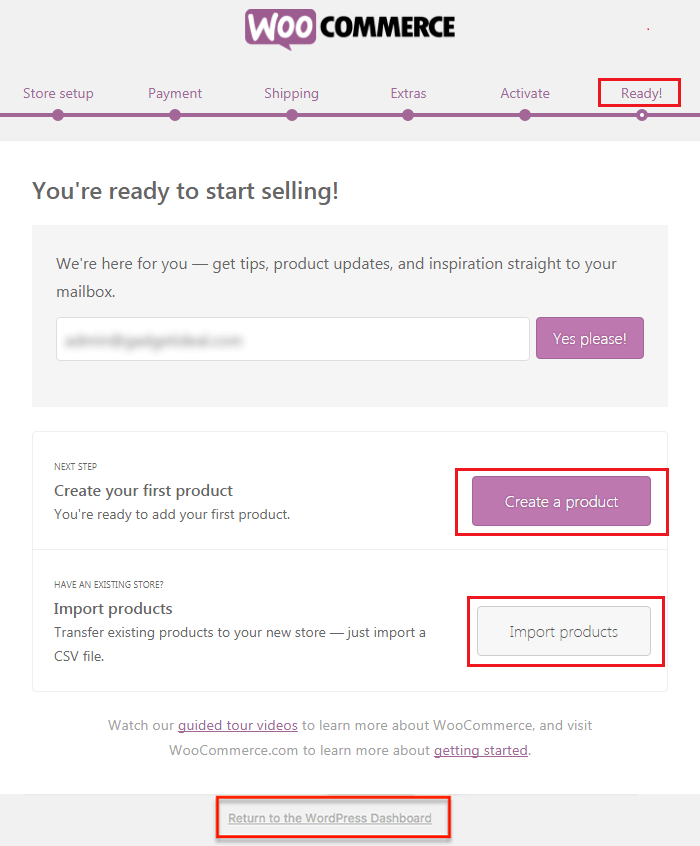
It’s the final tab of quick setup, which is named ‘Ready’ and here you can see mailbox to enter your Email to get tips, product updates, and inspiration about WooCommerece straight to your mailbox.
If you would like to get those, simply put your Email, and take a look at the other two options. There you can see the ‘Create a Product’ and ‘Import Products’
When you’re building a new Website then you need to a product page, isn’t it? But, not right now, need to do some more additional setup before creating the first Product page.
But, if you’ve already your product pages or an old site backup that you want to export to this new one, then ‘Import Products’ option is for you. You can transfer your existing products simply importing the CSV file.
Since you’re building a new website, then simply return back to the WordPress Dashboard by clicking the button at the bottom.
Choosing a Theme
If you’ve already installed the Storefront theme through the quick setup, then this section is not for you. You can go ahead to the ‘Additional WooCommerce Setup’.
 But, if it’s not, you can see a dialog box about WooCommerce integration like the image. Don’t worry, we’ll fix that.
At first, make sure which theme you want to choose. There are many eCommerce themes available like Flatsome, ShopKeeper, and WoodMart (these are Premium Themes).
When you want a top-notch design with completely professional look for your eCommerce, then my recommendation is to choose a premium WooCommerce theme.
However, in some cases, many people want to use Genesis Framework developed by StudioPress as I’m. Because it’s quick and easy to build incredible websites using Genesis in WordPress.
So, if you want to use Genesis framework, then first get installed your first child theme like Genesis Sample Master (but don’t forget to install Genesis Framework)
 Then, you need to install and activate the plugin ‘Genesis Connect’ to enable WooCommerce function with your Genesis theme. So, simply do that like you done before during the WooCommerce plugin installation.
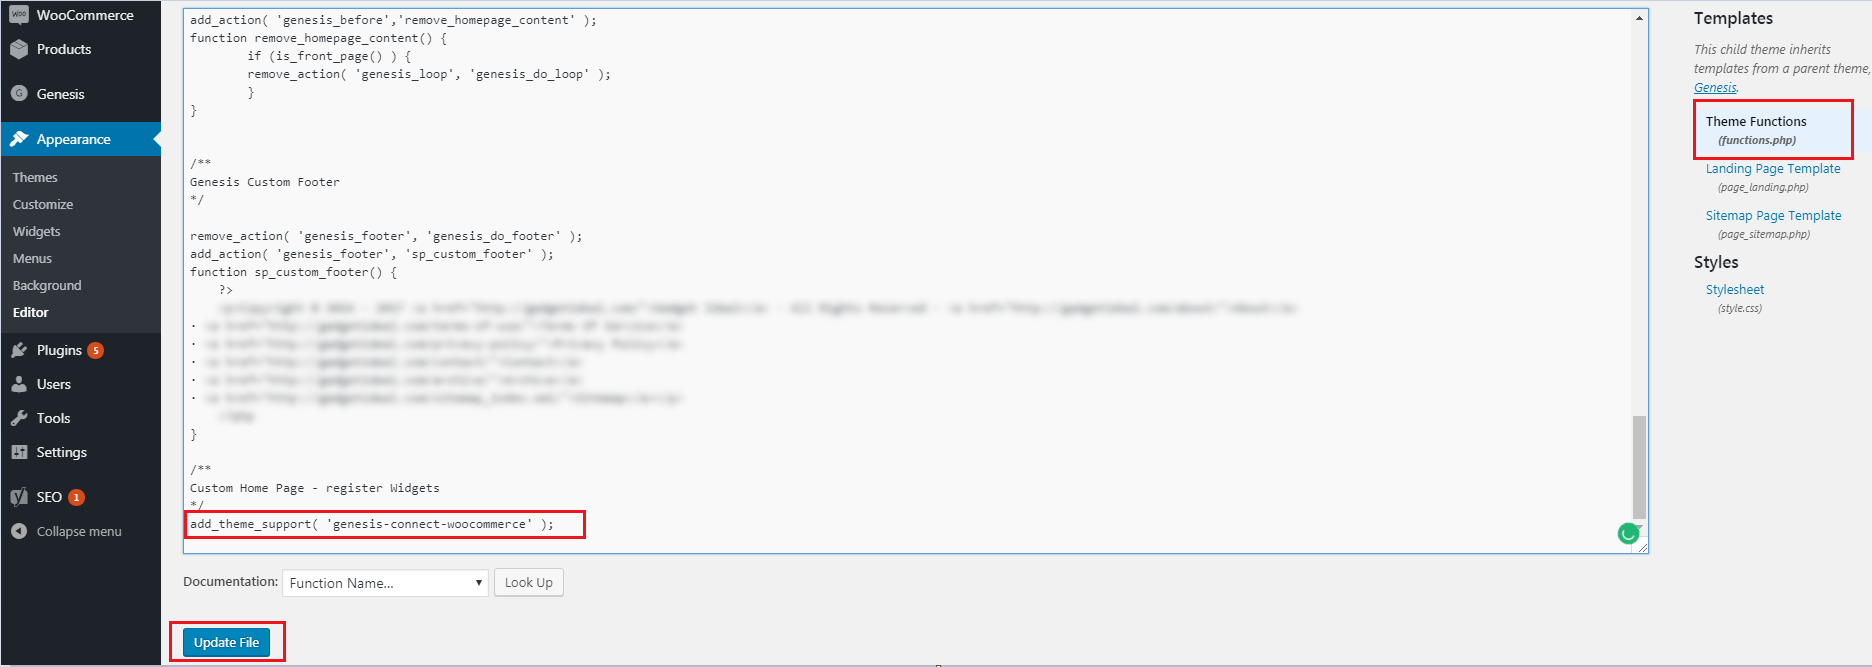 Now, you’ve to add a simple code to your child theme’s functions.php file to completely integrate WooCommerce with Genesis.
So, hover over the ‘Appearance’ button form your site dashboard and click on ‘Editor’, then select functions.php file to edit and add the below code at the bottom, then click Update.
add_theme_support( 'genesis-connect-woocommerce' );
So, now we can move on to additional setup of WooCommerce.
Additional WooCommerce Setup
Here, we need to set up some additional settings of WooCommerce.
General Settings
On the left side of your Website WP dashboard you can see two buttons called ‘WooCommerce’ and ‘Products’, simply hover over the ‘WooCommerce button and click on ‘Settings’.
However, there are other buttons available before settings, such as Orders, Coupons, and Reports. These options you’ll need after running your eCommerce website, so now we skip those.
So, as you open the settings option at first you can see the ‘General’ settings tab. Most of the setups here have already done through the Quick Setup during WoCommerce activation and by WooCommerce itself, you can change any of them anytime as you want.
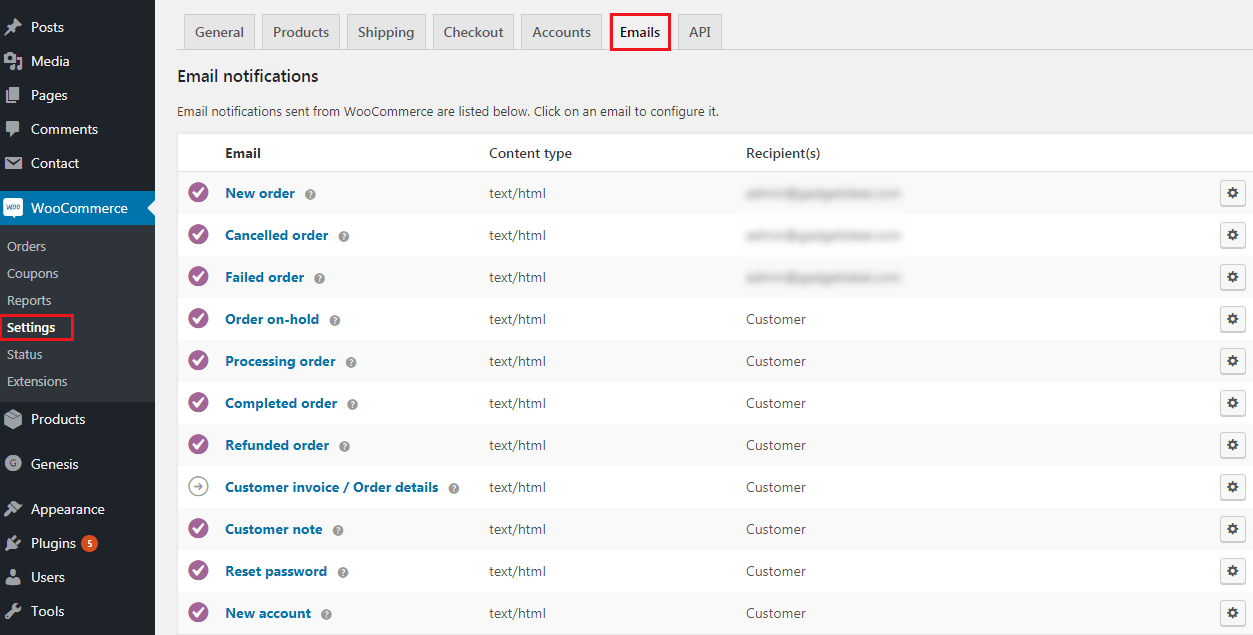 But, you should change something on the ‘Email’ tab. Here, you can change the recipient email for various standard emails for orders.
because if you’ve multiple people managing your online eCommerce store, then you might want new order notifications to go to the shipping department while canceled orders should probably go to the finance department.
Status
So, do it if you need and move on to the next option ‘Status’ under the ‘WooCommerce’ section of your Dashboard. With the Status option, you can get your technical information from memory allocated to the version number.
As well as, if you ever want to reset your entire store, then you can head to the Tools tab. Hopefully, you’ll never need it but it’s good to know where it is either way.
Extensions
Now, as you can see the next option is ‘Extension’ inside ‘WooCommerce’ section. This is where you’ll get the access to a huge range of extensions that you can use to make WooCommerce go further.
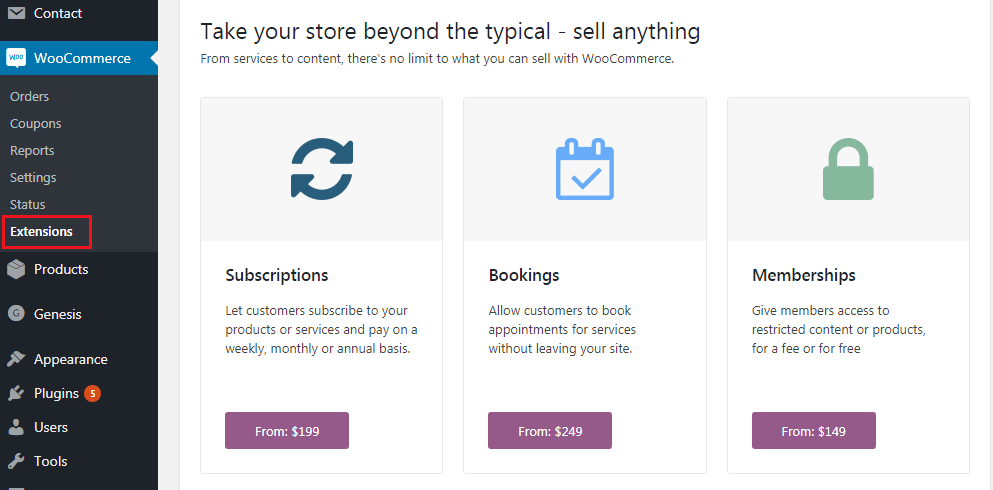 However, most of the extensions are paid here, but they cost way less and start working much faster than a custom solution. These extensions are easy to add on and this tab is where you can manage them.
So, almost all settings are done before you’ll go to add the first product to your eCommerce Website. Now, it’s time for adding products, let’s do it.
Adding The First Product to Your eCommerce Website
Before we begin adding the first product, I think you should add some product categories so you can organize your offerings easily.
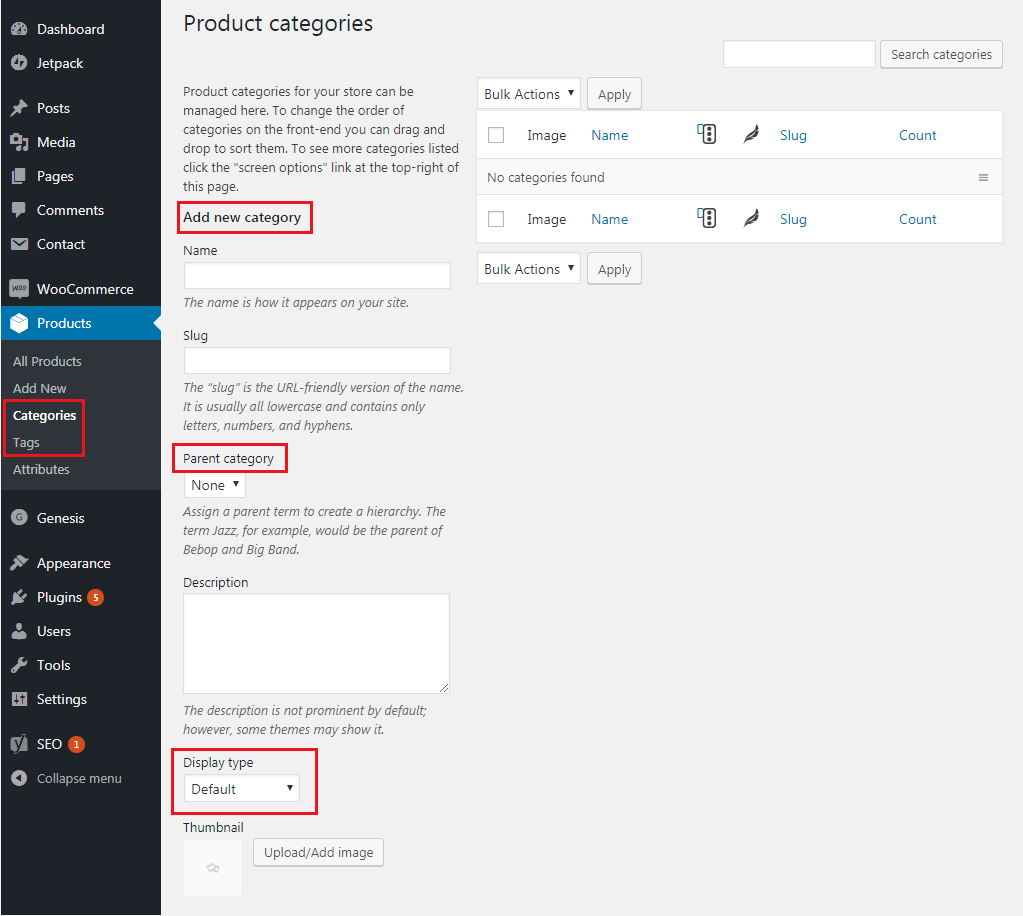 So, to add your categories go over to Products then Categories in your dashboard. Then, give your category a name, a slug for your URL ( if you leave this box blank your category name will be used as the slug).
A parent category (you would use this for nested items e.g. Shirts would be a parent for T-Shirts or Camp Shirt). As well as, a category description and display type (here default is to show all items in the category on the archive page.
But, you can also choose to show subcategories or both) and also an image (which is used when inserting a category grid on pages).
Then, you can move on to adding tags which is a similar process of adding categories. Although, it isn’t so necessary but can be very helpful for customers. Because Tags are great for grouping those items that don’t fall into the same category.
But, be sure you do not duplicate your categories with your tags while you’re adding Tags ( like having a “Long-Shirt” category and a “Long-Shirt” tag is bad for SEO and confusing for customers).
 So, once you’re done with Categories and Tags it’s time to add your products to your site.
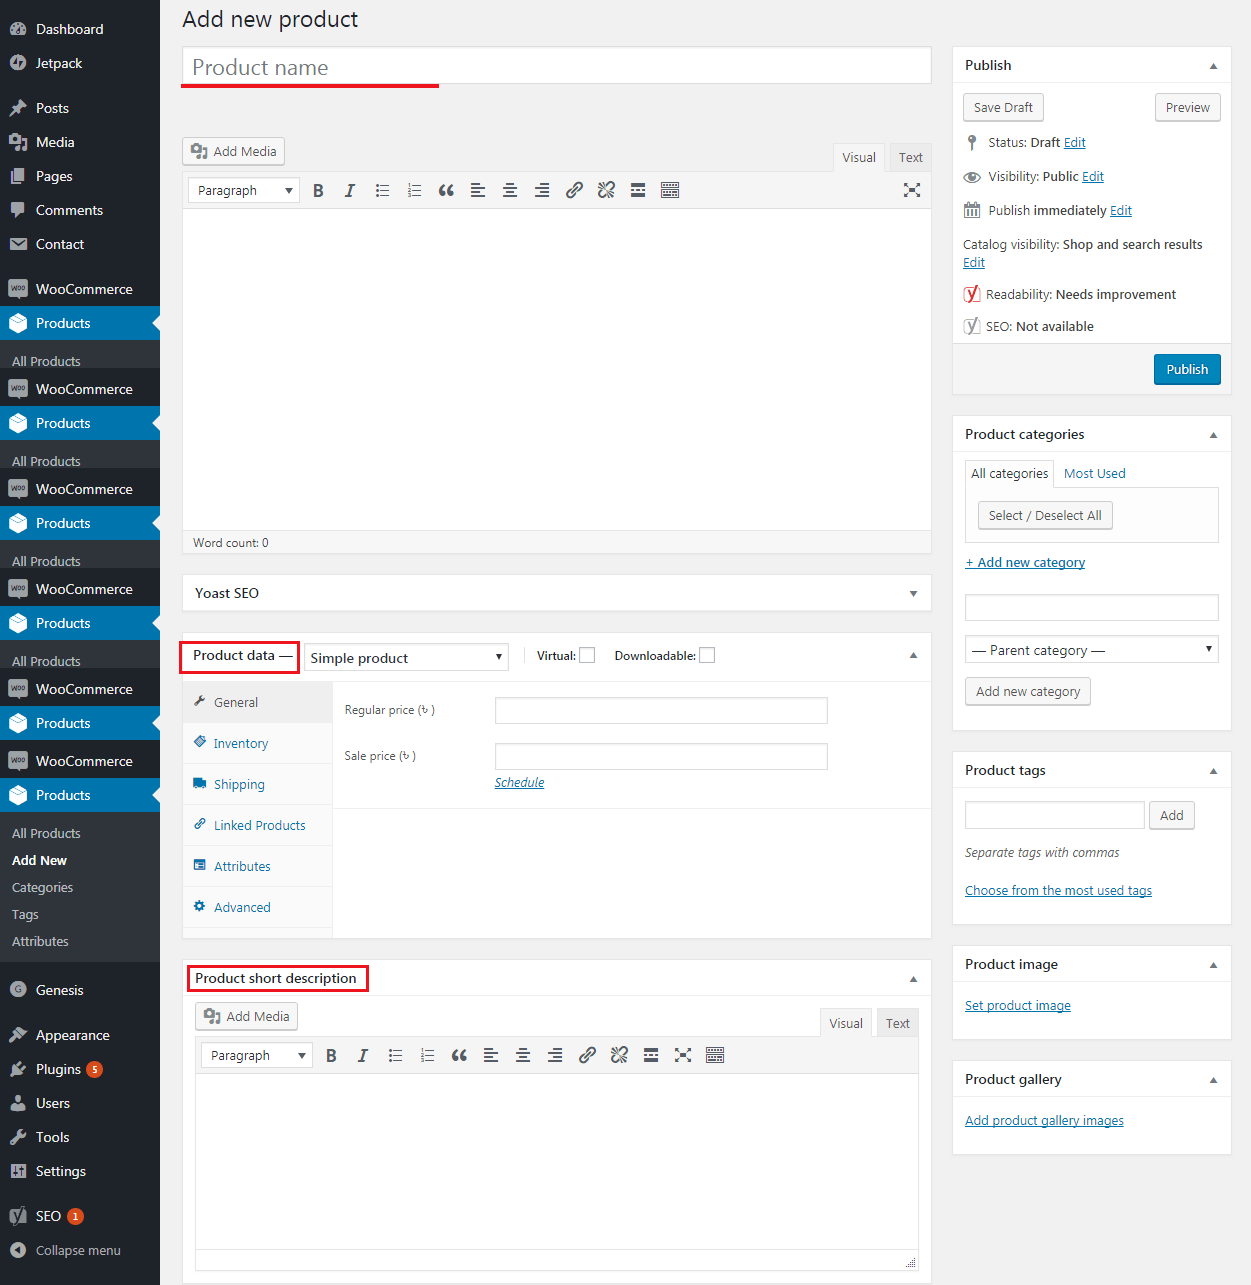
So, click on ‘Products’ then ‘Add New’, a new window will open and there you can see everything you need to add your products with plenty of option for information and pictures to describe every single detail about your products.
At first, give your products a name, select any categories or tags, and add the featured product image plus optional gallery images.
Now, in the first text box, you can add a long item description which will be displayed under the “Description” tab next to “Reviews” on the actual product page.
Then, in the second text box add a short product description to be shown alongside your product images (only a few sentences and some bullet points work great here).
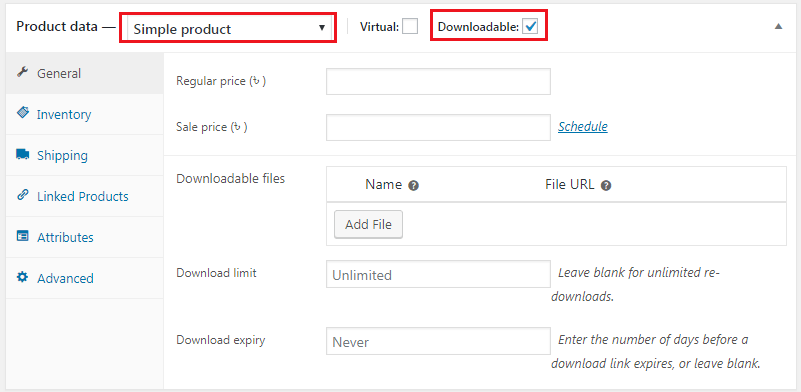 Now, you can see below the actual Product Data that is you choose the Simple Product setting you’ll see basic options to add a price and an SKU from inventory section (which is usually for your own records) and a price.
But, if the product is downloadable then you can check the Downloadable options and WooCommerce will display added options for the downloadable file.
But, if you choose to check the Virtual box as well the Shipping tab will be removed from the product section since you don’t need to ship a virtual item.
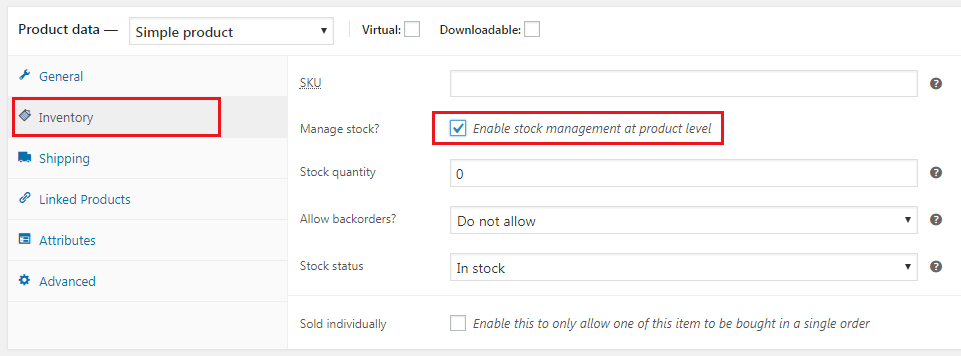
Under Product Data of the Simple Product section, you’ll also find options for managing your inventory which make sense if you keep a stockpile of your products at the ready to be sent out.
But, if your goods are made as they are ordered, or digital goods, then you probably won’t have much use for this tab.
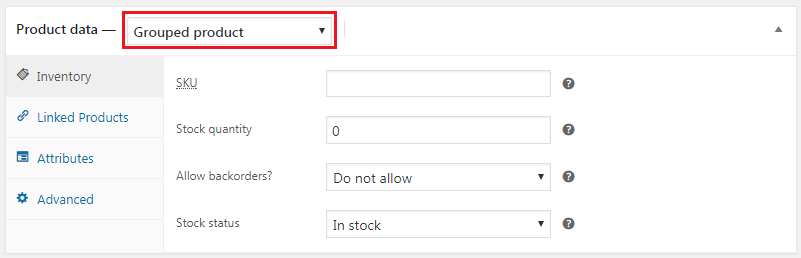
Next, you’ll find Grouped Product, if you want to sell your product as a group then you need this tab. But in most of the cases, it’s not important.
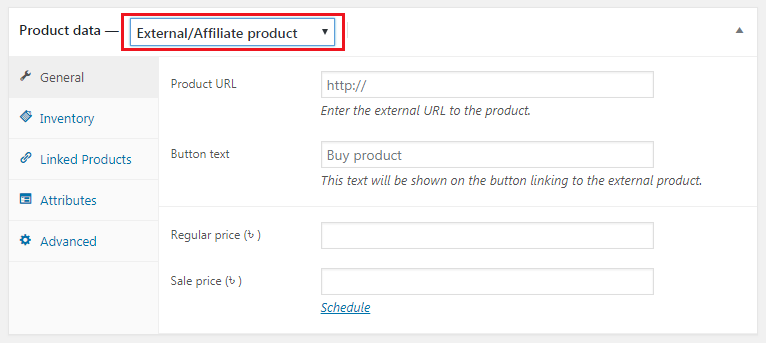
If you are selling external/affiliate product instead of a simple product, then select the External/Affiliate Product option and WooCommerce will display settings for linking to other websites with your affiliate link.
Which is great if you want to add products from stores with affiliate programs to your own store to make a referral commission.
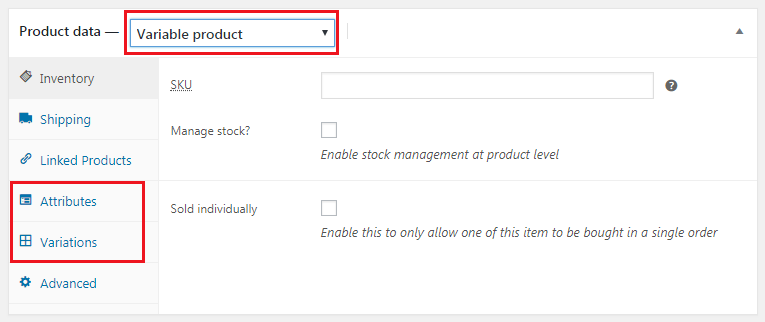 And, the last option you can select for your product data is a Variable Product which should be used when you have different styles of the same product, like a shoe in multiple sizes and colors.
For this first, you should add the attributes to your product then generate your variations using the attributes you added. By this way, your customers can choose exactly what they want from your selection.
Now, you can view the complete product page after publishing. So, now successfully we’ve added the first product to your own eCommerce Website.
You will love the following articles:
- How to Add TopBar in Genesis Framework (RainaStudio Map 101)
- How to Add an Audio Sound to Blog’s About Page (RainaStudio Map 101)
- How to Easily Add Slider On Home Page in WordPress
- How to Use Advanced Custom Fields on WordPress
- How to Create an Automatic WordPress Backup for Free
- How to Add MailChimp Subscribe Form to WordPress
- How to Disable Comments on WordPress
- How to Regenerate Custom Thumbnail Image Size
- How to Compress and Optimize Image on WordPress
- How to Add Caching Engine to WordPress Website
- How to Enhance Your WordPress Visual Editor
- How to Add Sitemaps to Google Webmaster
- How to Limit WordPress Login Attempts
- How to Secure Your WordPress Website
- How to Create Sitemaps for WordPress Website
- How to Add Google Analytics to WordPress Website
- How to Install WordPress Plugin
- How to Add GUTENBERG Visual Editor to WordPress
- How to do WordPress SEO technically (OnPage Guide)
- How to Add a Contact Form to WordPress
- How to STOP Spam Submission on Your Blog
- W3 Total Cache vs WP Super Cache – Which Should You Choose
- How to Use HTML Form [PHP]
- How to Setup Localhost for Custom Website Development in PC (RainaStudio Map 101)
- Small Business Website Design in New York
- Ecommerce Website development Made Easy WooCommerce
- 10 Reasons to Choose Genesis Theme Framework by StudioPress
- How Much Should a Website Design Cost You (Comprehensive Guide)
- How to Hire Best Freelance Web Designer in 2018
- How to Design a Website Using WordPress and Genesis Framework
- Use Genesis Framework for eCommerce Website Development
Wrap Up
I hope, this guide will be helpful to you easily build your own eCommerce website. However, there are much more you can do to enhance your online eCommerce store (perhaps we’ll talk about that later).
Anyway, if you’ve already got an eCommerce website then share your experience with us or if you got anything to tell about this tutorial, we also so eager to hear that.

