

Do You want to add an audio sound to your blog’s about page?
Here is an example live on About RainaStudio page. You’ll notice there on that page and the screenshot below has a volume icon right of the transliterate word of RainaStudio.
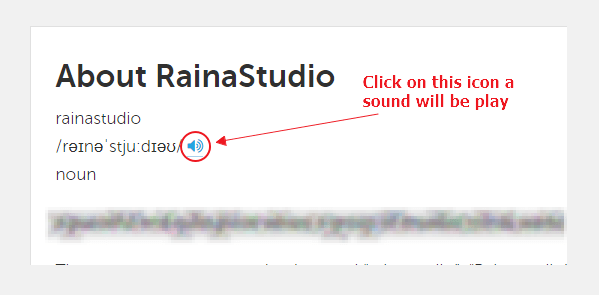
Someone when clicking on that icon a sound of RainaStudio pronunciation will be playing. You can do this yourself for your website. You will be able to add icon/button and clicking on that element a sound will be playing.
Add Audio Sound Anywhere on Your Website
Okay, let’s start. We should track step by step. Here on the RainaStudio Map 101 blog series, I am going to share behind-the-scenes and blueprint of RainaStudio. So, I am sharing exactly what and how it gets done.
Step 1: Sound Generation
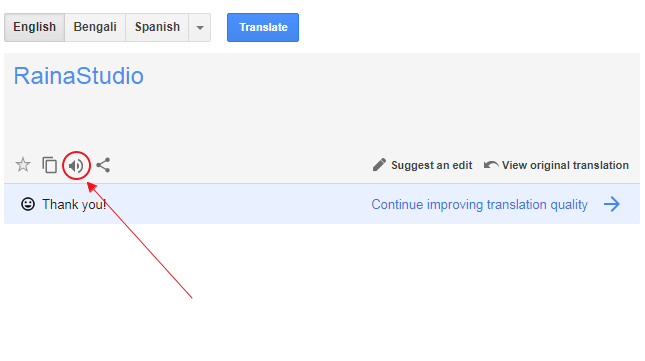
Go to Google Translate. I have used it to pronounce RainaStudio word and get the sound record.
Check out the screenshot below, clicking on the red circling icon on Google Translate website play pronounce of your given word. Play several times to make sure the pronounce sound is right for the word.
Install this Chrome extension, Chrome Audio Capture. It helps us to record audio sound. After installation of this chrome extension go back to Google Translate.

Press ctrl + shift + s to start audio record, by then click on that icon to play the sound. To stop record press ctrl + shift + x when sound end.
As sooner as you stop audio recording a tab will be open with captured audio options. Click on “Save Capture” to save file on your computer. Play the audio file to check if the sound of pronounce starts and stop at the right moment.
If it seems the sound starts a few seconds later after playing and need adjustment, use this mp3 cutter tool.
After getting your final sound file ready move to next step.
Step 2: Install Font Awesome
The volume icon is a Font Awesome icon. If you already get it installed on your website that is okay. I am showing you how you can do it yourself if you don’t get it installed. Let’s get hands dirty with some code.
Go to your cPanel or browsing current theme directory with FileZilla. In your theme directory check for functions.php file.
<?php
// Do NOT include opening tag.
// Enqueue Font Awesome.
add_action( 'wp_enqueue_scripts', 'your_site_font_awesome' );
function your_site_font_awesome() {
    wp_enqueue_style( 'font-awesome', '//maxcdn.bootstrapcdn.com/font-awesome/latest/css/font-awesome.min.css' );
}
Add the code snippet below into your theme’s functions.php and save the file. Go back to your website, reload, and check it works fine without error. No ERROR! Wow, we just integrated Font Awesome to our WordPress website successfully.
Step 3: Don’t Lose Yourself
Have you noticed? What? Okay, the name of step 3. At this very last step you might think we are almost done but concentrate as much as possible on it.
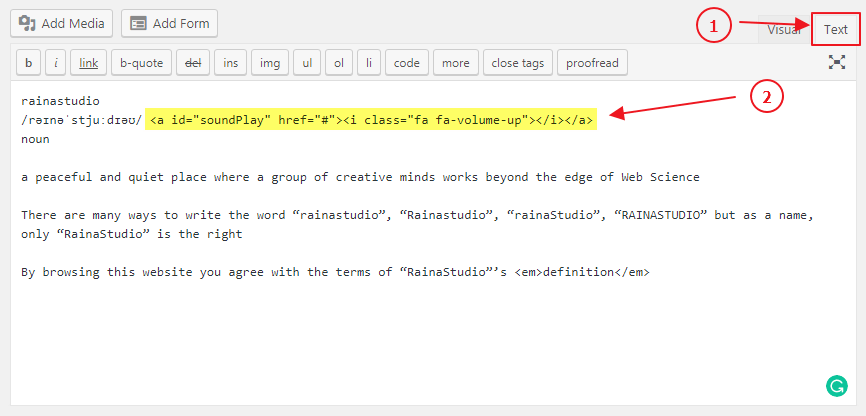
We are going to add a line of HTML to our page. Copy the code and paste it into the page like the image under of the snippet.
<a id="soundPlay" href="#"><i class="fa fa-volume-up"></i></a>
Give an update to the page after adding HTML. Now the time to store our audio file and call it into jQuery function to play onclick the icon. Below is the code snippet.
$(document).ready(function() {
    var audioElement = document.createElement('audio');
    audioElement.setAttribute('src', 'https://rainastudio.com/wp-content/themes/rainastudio/sound/rainastudio.mp3');
    audioElement.autoPlay=false;

    $('#soundPlay').click(function(e) {
        audioElement.play();

        // Cancel the default action
    e.preventDefault();
    });
});
In this code, you’ll be needed to change the path/URL of the audio sound file. We have uploaded our audio file in the sound folder under the current theme, rainastudio.
You could upload the audio file to your theme directory or anywhere you want at online.
Get the URL and replace with https://rainastudio.com/wp-content/themes/rainastudio/sound/rainastudio.mp3. Then save the file with sound.js name and put it into js folder of your theme. Open functions.php file again to enqueue sound.js.
<?php
// Do NOT include opening PHP tag.
// Enqueue 'sound.js'
add_action('wp_enqueue_scripts', 'sound_scripts');
function sound_scripts() {
    wp_register_script( 'app-sound-js', get_stylesheet_directory_uri() .'/js/rainastudio.js', array( 'jquery' ), CHILD_THEME_VERSION, true );
    wp_enqueue_script( 'app-sound-js' );

}
Add the above code snippet into functions.php file. Or, you can paste two lines below under wp_enqueue_style line you previously added into functions.php file at step 2.
Save the file and reload the page where the icon/button is, click on the icon to test. Hope, clicking on that icon the sound will be played.
Conclusion
This is a handy WordPress tutorial to add sound the way you want to represent to your audience. Leave feedback if you face any problem getting things done on end. I’m ultimately here to help you.
You will love the following Articles:
- How to Add TopBar in Genesis Framework (RainaStudio Map 101)
- How to Install WordPress Plugin
- How to Easily Add Slider On Home Page in WordPress
- How to Use Advanced Custom Fields on WordPress
- How to Create an Automatic WordPress Backup for Free
- How to Add MailChimp Subscribe Form to WordPress
- How to Disable Comments on WordPress
- How to Regenerate Custom Thumbnail Image Size
- How to Compress and Optimize Image on WordPress
- How to Add Caching Engine to WordPress Website
- How to Enhance Your WordPress Visual Editor
- How to Add Sitemaps to Google Webmaster
- How to Limit WordPress Login Attempts
- How to Secure Your WordPress Website
- How to Create Sitemaps for WordPress Website
- How to Add Google Analytics to WordPress Website
- How to Build an eCommerce Website Using WooCommerce
- How to Add GUTENBERG Visual Editor to WordPress
- How to do WordPress SEO technically (OnPage Guide)
- How to Add a Contact Form to WordPress
- How to STOP Spam Submission on Your Blog
- W3 Total Cache vs WP Super Cache – Which Should You Choose


One thought on “How to Add an Audio Sound to Blog’s About Page (RainaStudio Map 101)”
Thank you best post