

Having backups of your WordPress site is extremely important for security concerns. I think it’s the best defensive measure you can take easily for your site;
if somehow your website gets hacked and you lost all the data. Then, with backup, you can make your site live again in just a few minutes.
In this article, I’m going to show you how to create an automatic WordPress backup for free so that you can forget about losing the valuable data of your website.
Why You Need a Backup Solution for Your WordPress Site?
According to research, data loss and downtime cost $1.7 trillion each year to the global economy. Can you imagine that?
There is no website 100% secure on the internet and all of them are always vulnerable to data loss and security threats. Here below are some common scenarios when you may lose your data –
- Your website can get hacked and hackers may destroy all of your data.
- Your hosting provider can lose your data or you can forget to renew your hosting before expiration.
- Your website hosting provider reserves the right to terminate your account and delete all your data.
Besides that, there are many other scenarios where you could end up losing your website and all the valuable data created over the years.
This is why the best way to easily protect yourself against these threats is to regularly backup your WordPress site. In addition to that, you can also limit login attempts and add a security firewall for better protection.
Having said that, let’s dive into the automated backup creation for your WordPress site regularly.
Creating Automatic WordPress Backup
WordPress hasn’t its default backup solution. However, there are several great plugins which allow you to automatically backup and restore your WordPress site.

UpdarftPlus is one of the best backup plugins for WordPress sites, which allows you to setup automatic backup schedules. Besides that, it’ll also help you easily restore your WordPress site in case something bad happens.
So, let’s create an automatic backup system for your WordPress site.
Installing UpdraftPlus Plugin
First of all, you need to install and activate the UpdraftPlus plugin on your site.
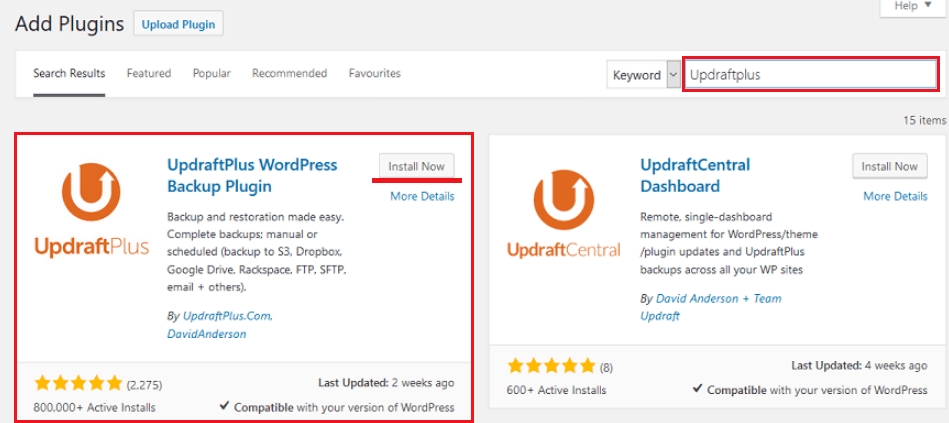 For this, go to Plugin » Add New. Now, search for the plugin on the search bar, then install and activate.
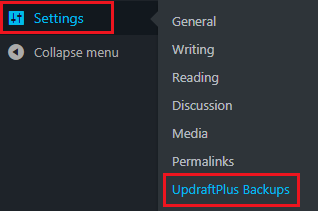 Once the plugin is activated, you’ll find the ‘UpdraftPlus Backups’ button under settings. So, click on it to open the plugin configuration settings page.
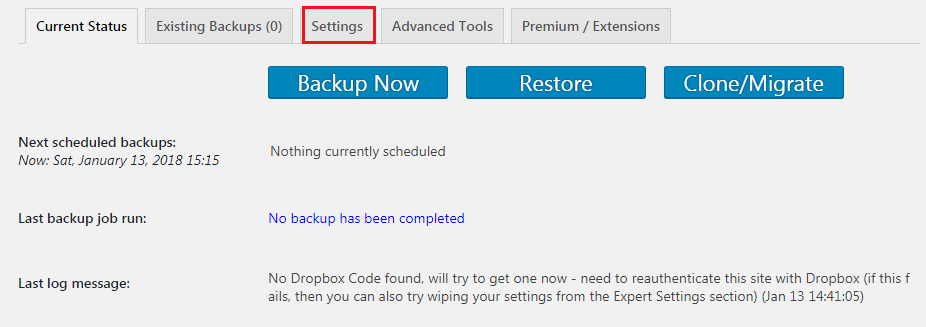 This is where you can set up an automatic backup schedule and a remote location to store your backups.
Automatic Backup Configuration
For automatic backup, you first need to choose a backup schedule for your files. Where the files include your WordPress site’s themes, plugins, images and other uploads.
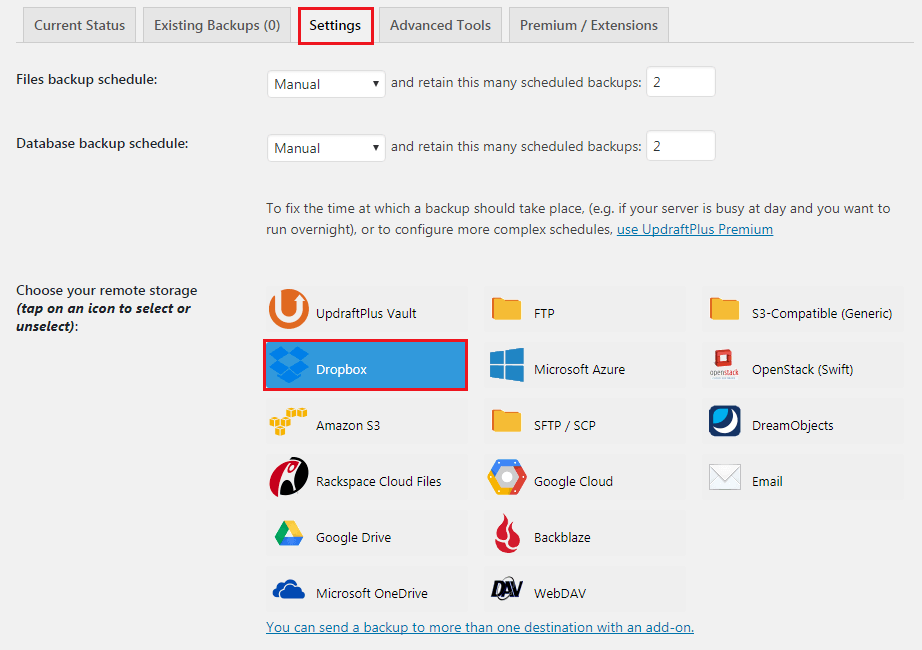 Next, you need to select a backup schedule for your WordPress site’s database. All your posts and pages, comments, website settings, are stored in the database.
Of course, the backup schedule should be based on how often you add new content to your website. As an example, if you add/publish three blog posts each week, then you can simply select a fortnightly backup of files and weekly backup of the database.
After that, you need to choose the location to store your all backup files.
By default, UpdraftPlus stores the backups to the same location as your website which isn’t a good idea at all. Because losing your website means you will also lose the access to your backup files.
That’s why you should choose a remote cloud storage service to store your backups.
As you can see, UpdraftPlus allows you to save your backups to several cloud storage services including Dropbox, Google Drive, Microsoft OneDrive, and some others. In addition to that, you can also send your backups to an email address.
So, simply click on a remote storage to select it. Then, you will see setup instructions.
Remote Backup to Dropbox
Here, I’ll be showing you how to use Dropbox as the remote backup storage location with UpdraftPlus.
So, click on Dropbox to select it, and then scroll down to the bottom of the page and click on the save changes button. After getting the setting saved, now you need to give UpdraftPlus access to your Dropbox account.
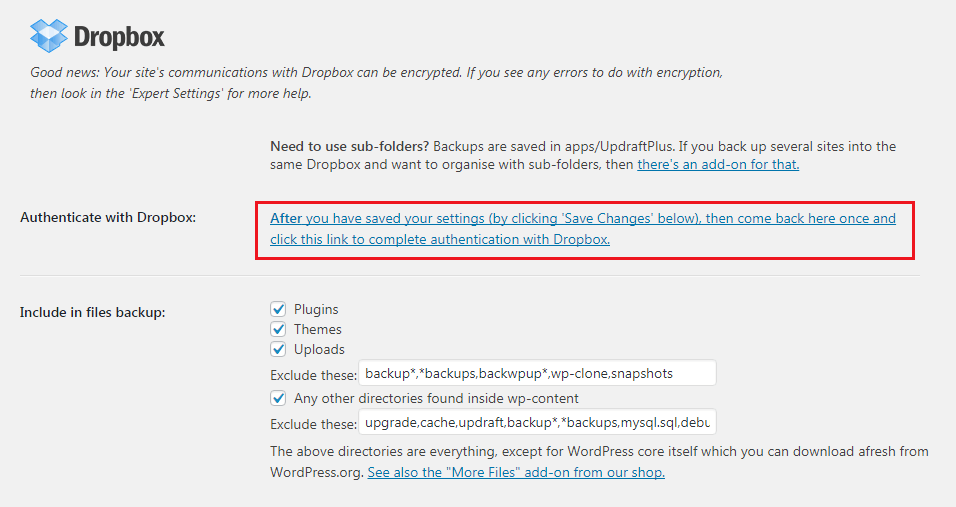 For This, scroll down to remote storage setup instructions and click on the link next to ‘Authenticate with Dropbox’ option. It’ll take you to the Dropbox website where you will be asked to sign-in using your Dropbox email and password.
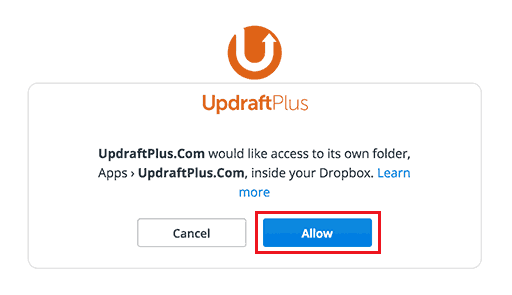 Then after login, you will be asked for permission to allow UpdraftPlus to access your Dropbox account. There is nothing to worry about it, UpdraftPlus will only have permission to access its own folder. So, click the ‘Allow’ button.
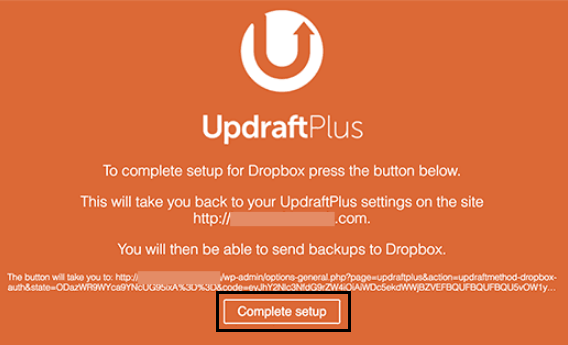 Now, you’ll be redirected to UpdraftPlus website where you need to click on the ‘Complete Setup’ button to finish setup.
Once the setup finished, you’ll be taken back to your WordPress site’s UpdraftPlus settings page again. Now, scroll down to the bottom of the page and click on the Save Changes button.
That’s it, the automatic backup is on and all the backups will be stored safely in your remote cloud storage.
You will love the following Articles:
- How to Add TopBar in Genesis Framework (RainaStudio Map 101)
- How to Add an Audio Sound to Blog’s About Page (RainaStudio Map 101)
- How to Easily Add Slider On Home Page in WordPress
- How to Use Advanced Custom Fields on WordPress
- How to Install WordPress Plugin
- How to Add MailChimp Subscribe Form to WordPress
- How to Disable Comments on WordPress
- How to Regenerate Custom Thumbnail Image Size
- How to Compress and Optimize Image on WordPress
- How to Add Caching Engine to WordPress Website
- How to Enhance Your WordPress Visual Editor
- How to Add Sitemaps to Google Webmaster
- How to Limit WordPress Login Attempts
- How to Secure Your WordPress Website
- How to Create Sitemaps for WordPress Website
- How to Add Google Analytics to WordPress Website
- How to Build an eCommerce Website Using WooCommerce
- How to Add GUTENBERG Visual Editor to WordPress
- How to do WordPress SEO technically (OnPage Guide)
- How to Add a Contact Form to WordPress
- How to STOP Spam Submission on Your Blog
- W3 Total Cache vs WP Super Cache – Which Should You Choose
Wrap Up
Hope, this article will be helpful to keep regular backup your WordPress site automatically. So that, you can restore your site again if anything bad happens.
Anyway, if you’ve already used UpdraftPlus to your WordPress site, please share your experience and tips with us. Here we are all together.

