![How to Use HTML Form [PHP]](https://rainastudio.com/wp-content/uploads/2019/07/How-to-Use-HTML-Form-PHP.png)


Do you know? What is the HTML element that is most used all over the web? An interactive web application without HTML form is unimaginable.
Today we are going to learn how to use HTML format it’s prime and get the best result from it in our daily web development.
The Basics of Using HTML Form
Mainly, the HTML form collects data from the user/visitor and sends it to the server.
Then what can be done with this simple thing?
Well, when we can get user data to our server, we can use/verify/save/ that data and also show the user/visitor a result using a server-side language like PHP.
The image you have has dynamic data, which is inputted by a user inside a powerful server-side language that not you can do. If you are a code freak, you can explore a lot of things.
Any login or registration form runs on the same basics. Any search form runs on the same basics.
As I love PHP most, I will use that by default in this article.
The HTML Form Element

<form method=”post” action="somepage.php">
  First name:<br>
  <input type="text" name="firstname" value="Tred"><br>
  Last name:<br>
  <input type="text" name="lastname" value="Nred"><br><br>
  <input type="submit" value="Submit">
</form>
The form element has to be consisted of a few input elements and a submit button to act appropriately according to our needs. Let’s take a look at form essential attributes.
Action: Form action attribute directs the form to a page or file. If we want to send the data to the same page, we will need to keep the action attribute value blank.
Method: There are two methods that a form can choose to send data.
- POST: Means it will send the data appending inside the body of an HTTP request. It will not show them in the URL. Very useful to collect sensitive submissions.
- GET: Means it will send the data appending to the URL of the page. It can be bookmarked and used to send less sensitive data.
Form Method “Get”
<form method="get" action="">
    <input type="text" name="searchTerm" value="" />
    <select name="in_category" >
        <option value="112"> Lores Ipsum </option>
        <option value="113"> Demo Text </option>
    </select>
    <input name="searchPost" type="submit" />
<form>
I kept the action field blank to target the same page in which the form is currently showing.
When we submit the form, we can have a URL like this
https://localhost:81/test.php?searchTerm=213&in_category=113
The form is collecting and sending data using the get method to the server. We can use a server-side language like PHP to process the data. Server-side PHP can collect the data by using $_GET[‘input-field-name’]. $_GET is a server variable which stored all the data that is sent using GET.
For Example
<?php
    //checking if the current request has the $_GET param.
    //we acces the data which is through get method by ise $_GET[];
    //$_GET is an array and we will need to use the inpute name to acces the single value.
    //isset check if it set
    if(isset($_GET['searchPost'])){
        $searchTerm = $_GET['searchTerm'];
        $in_category = $_GET['in_category'];
        echo $searchTerm . $in_category ;
    }
?>
Now we can use the variables for any task.
The form post example is coming soon. If you have any opinion, you can share it through comments.
Form Method “Post”
Form Post method is used to perform actions that depend on sensitive and confidential data. Login form, Signup Forms, and many other forms use this method to send the data to the server.
See above, when we used method GET, the data is being shown in URL, whereas when we use the POST method, it appends the data to the body of that HTTP request, and what does this means is it does not show the data to the URL.
So let’s see a straightforward post method form example:
<form method="post" action="">
    <input type="text" name="searchTerm" value="" />
    <select name="in_category" >
        <option value="112"> Lores Ipsum </option>
        <option value="113"> Demo Text </option>
    </select>
    <input name="searchPost" type="submit" />
<form>
Again, I kept the action attribute value blank so that the form can send the data to the same page in which the form is currently being displayed.
Now, if we save it in a PHP file and click submit, we won’t see any changes to the URL; well, then how do we know the form is sending data to the server?
There is certainly away!
After clicking submit if we go to inspect element > network, then we can see the evidence that the forms are submitted or not.
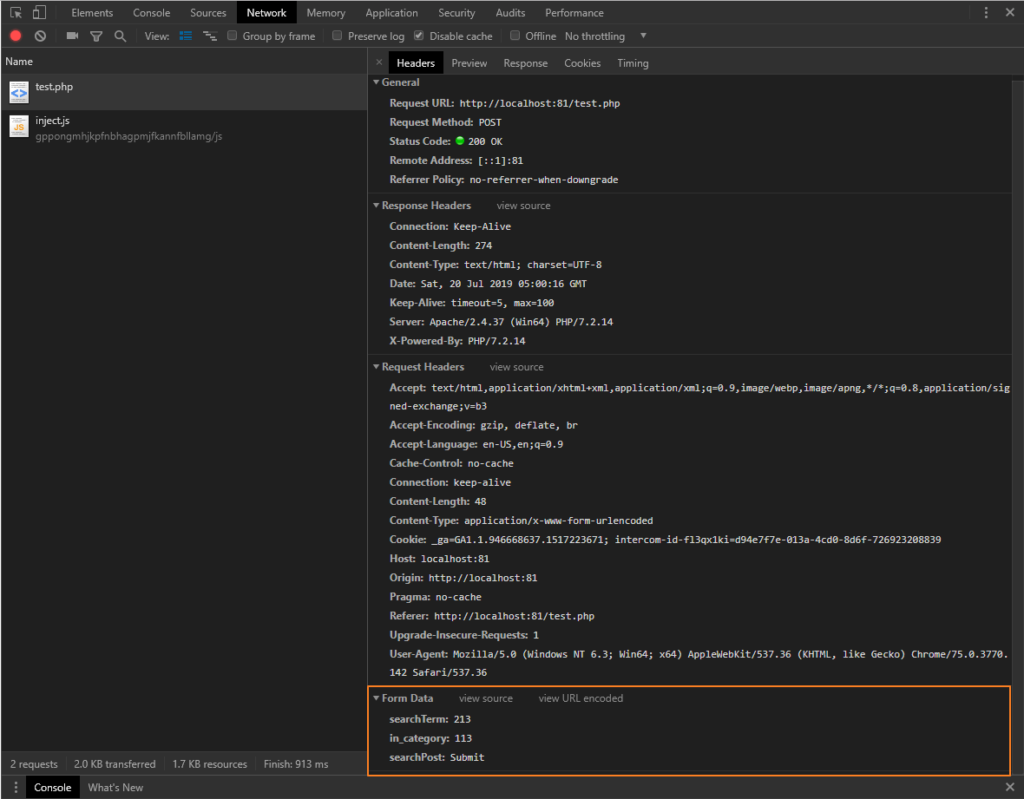
We can see that the data has been sent to the server now if we go back to the test.php file and put something like this.
<?php
    //checking if the current request has the $_POST param.
    //we acces the data which is through get method by ise $_POST[];
    //$_POST is an array and we will need to use the inpute name to acces the single value.
    //isset check if it set
    if(isset($_POST['searchPost'])){
        $searchTerm = $_POST['searchTerm'];
        $in_category = $_POST['in_category'];
        echo 'You have searched for '.$searchTerm. ' which should be in category: '.$in_category;
    }
?>
Server can access POST data using $_POST[‘input-field-name’] .
Read also: How to Add a Contact Form to WordPress
Conclusion
We have gone through the basics of using an HTML Form using PHP as a server-side language. If you love to code, go, and explore the form as far as you can. Because there is no end what you can do with form and form processing.
If you found it useful, then it’s our satisfaction. Share your thoughts with comments.
You will love the following tutorials:
- How to Add Nofollow Tag to a Certain Domain
- How to Add Visitor Counter to Website in PHP
- How to Combine a Background Image and CSS3 Gradient on the Same Element
- How to Popup Genesis eNews Extended Opt-in Form
- How to Add Custom Logo to Genesis Child Theme
- 11 Genesis Framework Hacks for Beginner
- Starting with WordPress Metafields
- How to Store XML Data to PHP Variable
- How to Create Awesome Input Range Slider
- How to Make HTML Form Work and Send Mail
- How to Setup Localhost for Custom Website Development in PC (RainaStudio Map 101)
- Use Genesis Framework for eCommerce Website Development
- Small Business Website Design in New York
- Ecommerce Website development Made Easy WooCommerce
- 10 Reasons to Choose Genesis Theme Framework by StudioPress
- How Much Should a Website Design Cost You (Comprehensive Guide)
- How to Build an eCommerce Website Using WooCommerce
- How to Hire Best Freelance Web Designer in 2018
- How to Design a Website Using WordPress and Genesis Framework

