

Are you a blogger? Do you want to add multiple custom heading style formats for your articles or in page content? Yes! You landed on the right page.
Today, in this post, you going to learn how you will add some custom heading style formats to WP visual editor.
If you would use any of the drag and drop content builder, you got noticed there is an element called “Custom Heading.” With this element, you can add optimized content headings with attractive colors, font family, and font-weight.
I tried to add such an element for content or article. If you don’t use any content builder for your WordPress website yet you want a feature like this, go through this post. 🙂
Oh!!! You may don’t know; this is one of the articles of RainaStudio Map 101 blog series. You can check out previous posts of this series.
- Custom Related Posts After Entry Footer in Genesis
- Custom Social Share Buttons with Counter in Genesis
- Custom 404 Not Found Page in Genesis Framework
Custom Heading Style Formats in the Genesis Framework
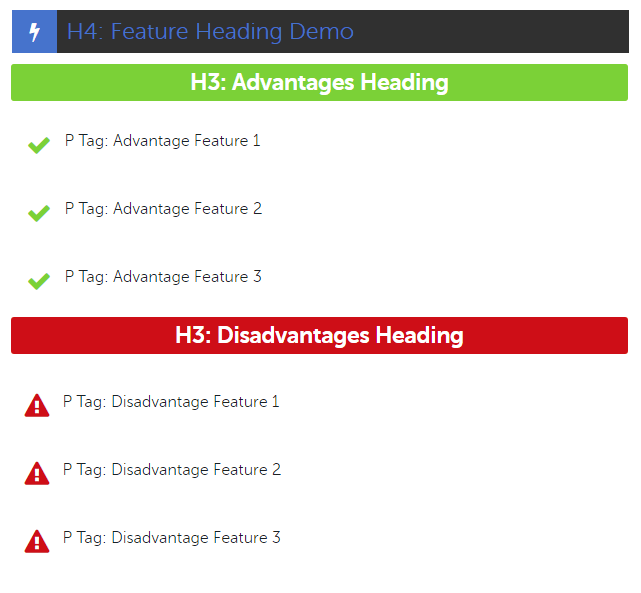
We are using the Genesis Framework child theme for our personal and client projects. So, most of the experiments we went through using this popular framework. The following screenshot is the demo of custom headings on our website.
Let’s get hands dirty with code. We are using FontAwesome Icon font for the icons before each heading. Install FontAwesome icon font on your website, including this piece of code into functions.php file.
// Enqueue Font Awesome.
add_action( 'wp_enqueue_scripts', 'your_site_font_awesome' );
function your_site_font_awesome() {
    wp_enqueue_style( 'font-awesome', '//maxcdn.bootstrapcdn.com/font-awesome/latest/css/font-awesome.min.css' );
}
The following code is to enable hidden TinyMCE “Formats” buttons. If you use the Genesis child theme, add below code snippet in your child theme’s functions.php file.
// Enable hidden formates buttons to WP visual editor
function myprefix_mce_buttons_2( $buttons ) {
    array_unshift( $buttons, 'styleselect' );
    return $buttons;
}

add_filter( 'mce_buttons_2', 'myprefix_mce_buttons_2' );
Save the file, visit Posts > All Posts > Post[Edit], and You’ll notice the TinyMCE Formats button to WordPress visual editor like the following image.

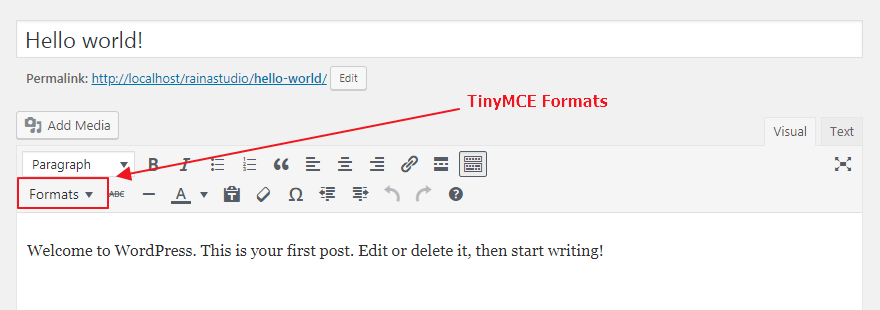
We are going to add custom heading styles to the drop-down menu of this button. Add the following code to functions.php file.
/**
* Add custom styles to the mce formats dropdown
*
* @url https://codex.wordpress.org/TinyMCE_Custom_Styles
*
*/
function myprefix_add_format_styles( $init_array ) {
$style_formats = array(

                            // Each array child is a format with it's own settings - add as many as you want
                            array(
                            'title' => __( 'Highlight Feature', 'TEXT_DOMAIN' ), // Title for dropdown
                            'block' => 'h4', // Wrap h4 around the selected content
                            'classes' => 'hfeature' // Class name used for CSS
                            ),
                            array(
                            'title' => __( 'Demo Button', 'TEXT_DOMAIN' ), // Title for dropdown
                            'block' => 'a', // Wrap a around the selected content
                            'classes' => 'button demo-btn' // Class name used for CSS
                            ),
                            array(
                            'title' => __( 'Affiliate Button', 'TEXT_DOMAIN' ), // Title for dropdown
                            'block' => 'a', // Wrap a around the selected content
                            'classes' => 'button aff-btn' // Class name used for CSS
                            ),
                            array(
                            'title' => __( 'Advantages Head', 'TEXT_DOMAIN' ), // Title for dropdown
                            'block' => 'h3', // Wrap h3 around the selected content
                            'classes' => 'advan-head' // Class name used for CSS
                            ),
                            array(
                            'title' => __( 'Advantages Feature', 'TEXT_DOMAIN' ), // Title for dropdown
                            'block' => 'span', // Wrap span around the selected content
                            'classes' => 'advan-feat' // Class name used for CSS
                            ),
                            array(
                            'title' => __( 'Disadvantages Head', 'TEXT_DOMAIN' ), // Title for dropdown
                            'block' => 'h3', // Wrap h3 around the selected content
                            'classes' => 'dadvan-head' // Class name used for CSS
                            ),
                            array(
                            'title' => __( 'Disadvantages Feature', 'TEXT_DOMAIN' ), // Title for dropdown
                            'block' => 'span', // Wrap span around the selected content
                            'classes' => 'dadvan-feat' // Class name used for CSS
                            )
                );
                $init_array['style_formats'] = json_encode( $style_formats );
                return $init_array;
}
add_filter( 'tiny_mce_before_init', 'myprefix_add_format_styles' );
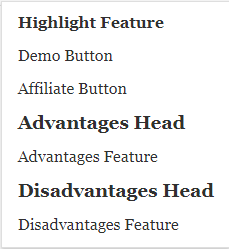 Here you go, we got all of our custom heading formats like the screenshot here on the left. Check yours.
When you edit any article or content and want to add custom headings to that article, select all text of the heading. Click one of the heading formats in the drop-down menu to shape it as you want, after writing down your title.
Before doing that, we need to add some CSS code to style.css file of your child theme. Open the file and include the following code in the data.
/**
* # Custom Heading CSS
*---------------------------------------------------------- */
h4.hfeature {
padding: 10px 0 10px 10px;
background: #333333;
border-left: 45px solid #4872cb;
font-weight: 300;
position: relative;
display: flex;
font-size: 23px;
line-height: 1;
color: #4872cb;
}

.hfeature:before {
font-family: FontAwesome;
left: -27px;
position: absolute;
color: #fff;
font-size: 20px;
top: 12px;
content: '\f0e7';
}

h3.advan-head {
background-color: #7ad03a;
color: #fff;
padding: 5px 17px;
border-radius: 3px;
text-align: center;
}

span.advan-feat {
padding-left: 40px;
padding: 10px 0 10px 5px;
border-left: 50px solid transparent;
position: relative;
display: block;
}

span.advan-feat:before {
content: '\f00c';
font-family: FontAwesome;
left: -33px;
position: absolute;
color: #7ad03a;
font-size: 25px;
top: 15px;
}

h3.dadvan-head {
background-color: #CD161D;
color: #fff;
padding: 5px 17px;
border-radius: 3px;
text-align: center;
}

span.dadvan-feat {
padding-left: 40px;
padding: 10px 0 10px 5px;
border-left: 50px solid transparent;
position: relative;
display: block;
}

span.dadvan-feat:before {
content: '\f071';
font-family: FontAwesome;
left: -33px;
position: absolute;
color: #CD161D;
font-size: 25px;
top: 15px;
}
We are done adding code to our theme’s file for custom heading style formats. Edit article, add as much as custom headings and sub-headings you want, make it colorful and enjoyable.
You will love The following tutorials:
- How to Install and Configure Really Simple SSL WordPress Plugin
- How to Add Simple Social Icons Widget Plugin in WordPress
- How to Add Custom JavaScript to WordPress
- How to Add Facebook Customer Chat to Your WordPress Website
- How to Show Related Posts in WordPress
- How To Change Text Color In WordPress Post
- How to Develop Mega Menu in WordPress
- Custom Post Types to Genesis WordPress Theme Framework (RainaStudio Map 101)
- Template Page Attributes for Custom Post Type [WP Support]
- Add Custom CSS to WordPress 5.0 Admin for Post Editor
- Custom Front Page Template Design for Blog Website in Genesis (RainaStudio Map 101)
- Custom Related Posts After Entry Footer in Genesis (RainaStudio Map 101)
- Custom Social Share Buttons with Counter in Genesis (RainaStudio Map 101)


2 thoughts on “Add Custom Heading Style Formats to WP Visual Editor Without Plugin (RainaStudio Map 101)”
Great article! Keep it up……
I really enjoyed reading the post you shared. I hope you will get to read such an article in future also.