WordPress is the most popular CMS on the market today that’s evident in the fact that over 25% of all websites on the entire World Wide Web are powered by its software.
So, there are most chances to get attacked than other less popular Content Management Systems.
However, WordPress built-in security is pretty good but as like any other system, there are potential security issues that may arise if some basic security precautions aren’t taken.
So, in this article, I’m going to show you how to secure your WordPress Website against security threats like hacking, malware, brute force attacks, etc.
You may also read this article about – How to Stop Spamming on WordPress Website?
Let’s Secure Your WordPress Website
If there is a dream inside your mind about the WordPress Site you’ve already created and running, it’s really worth to ensure its security anyhow.
Fortunately, WordPress contains a such amount of features that you can’t imagine. This is why, we’ve plugins to choose for specific functions (such as for WordPress SEO optimization Yoast Plugin is the best).
So, we’ve a bunch of WordPress Security Plugins to keep safe our site, and here I’m focusing over the Plugin which allows you secure your WordPress Website easily and efficiently.
The plugin is Wordfence Security. You can also limit login attempts to your WordPress site for instant protection.
Tell me a little about Wordfence Security
Well! Wordfence is one of the most popular WordPress security plugins, which helps you protect your website against security threats such as hacking, malware, DDOS and brute force attacks.
It has a built-in website application firewall which filters all traffic to your website and blocks suspicious requests.

However, the basic Word fence plugin is free, it also comes with a premium version that gives you access to more advanced features like firewall rules updated in real time, country blocking, scheduled scanning, and more.
So, now let’s move on to ensure your WordPress Website using Wordfence Security plugin.
Installing Word fence Security
First, go to the plugin on your WordPress Dashboard and click ‘Add New’ and you’ll find the window for installing your plugin.
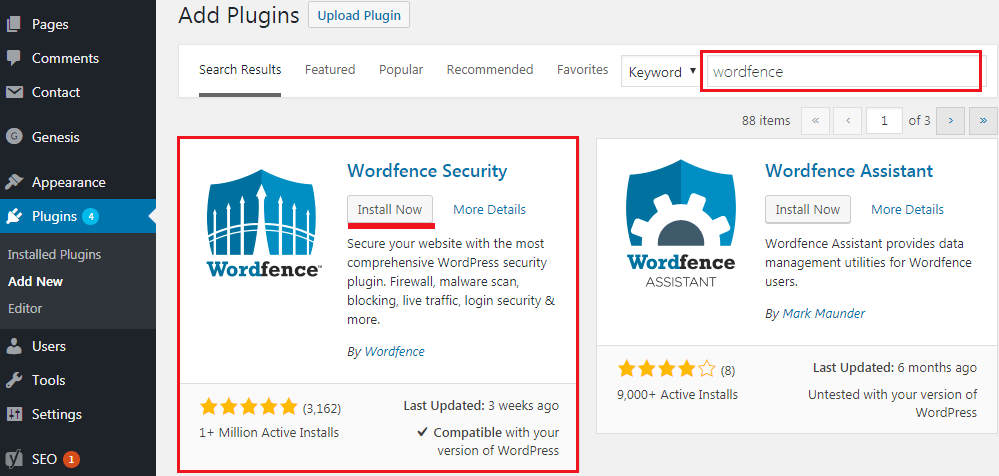
Once, it activated, a pop-up window will open instantly. Simply close the window and you can see the ‘Word fence’ button on your dashboard. So, it’s time to setup Word fence on your WordPress website.
Setting Up Word fence Security
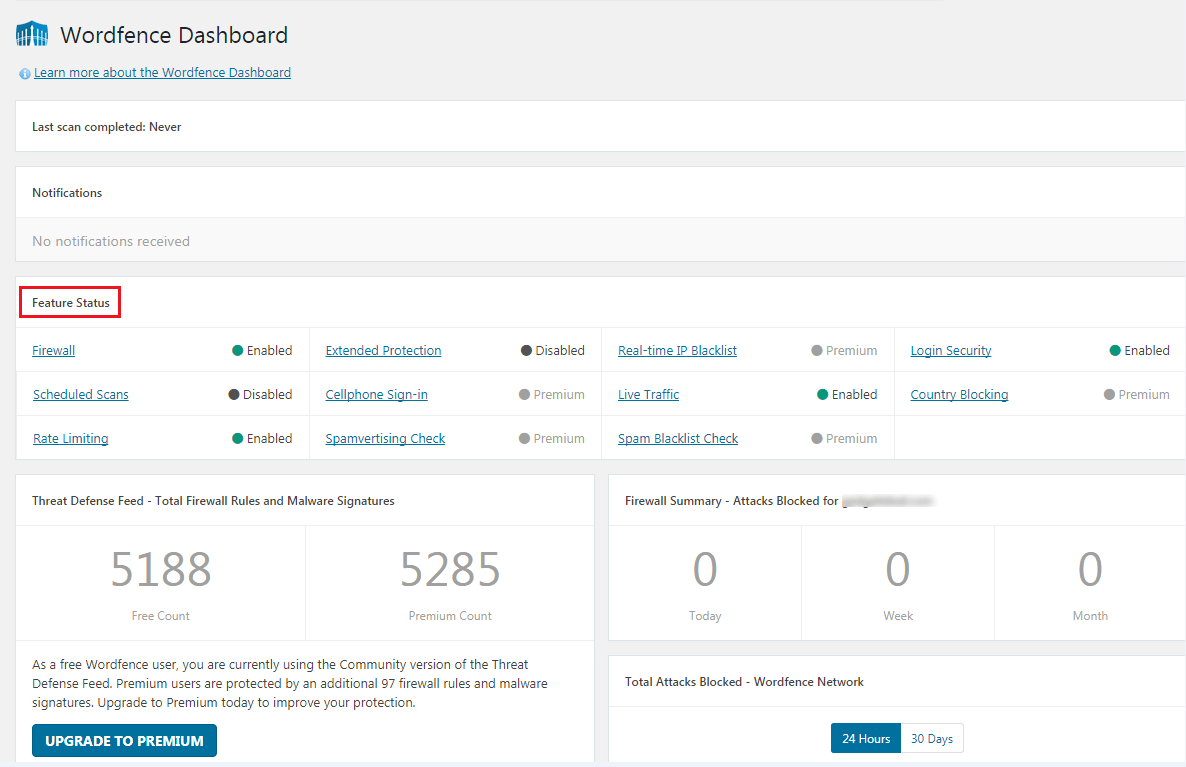
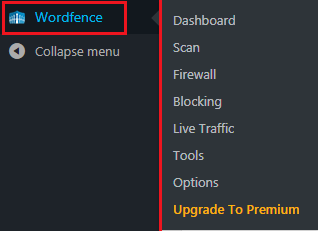
Now, click on the ‘Word fence’ button from your dashboard and it’ll take you to the Word fence dashboard.
Scanning Your Website
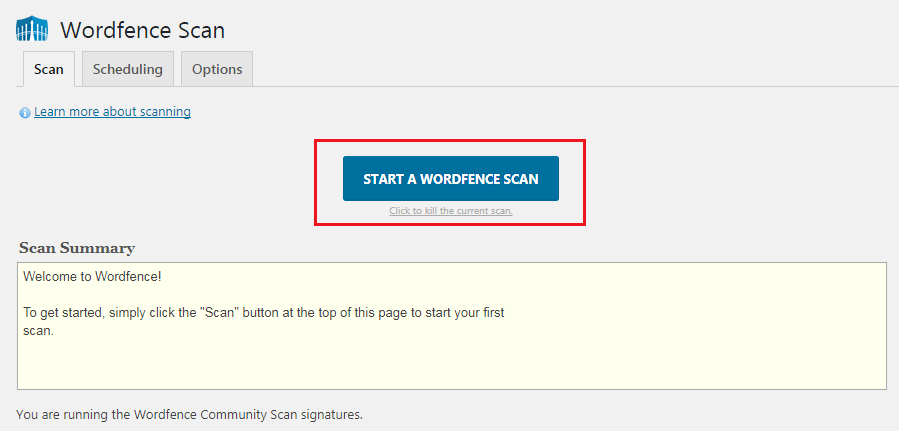
Now, click the ‘Scan’ button under Word fence menu section and it’ll open the scanning window for your WordPress Website.
So, let’s start a scan. Once you click the ‘Start a WordPress Scan’ button, it’ll start scanning to look for changes in file sizes in the official WordPress core and plugin files.
Even, it’ll also look inside the files to check for suspicious code, malicious URLs, back-doors, and any known patterns of infections.
Word fence does the scan as efficiently as possible, however the time it takes to complete a scan will depend on how much data you have, and the server resources available.
You’ll be able to see the progress of the scan in the yellow boxes on the scan page during the scanning process.
And, once the scan is finished, Word fence will show you the results including notifications (if it found) any suspicious code, corrupted files, infections, or malware on your WordPress website.
As well as, will also recommend initial actions to take to fix those issues.
This free version of Word fence automatically runs full scans on your WordPress site once every 24 hours. But, with the Premium version you can set up your own scan schedules.
Setting Up Firewall
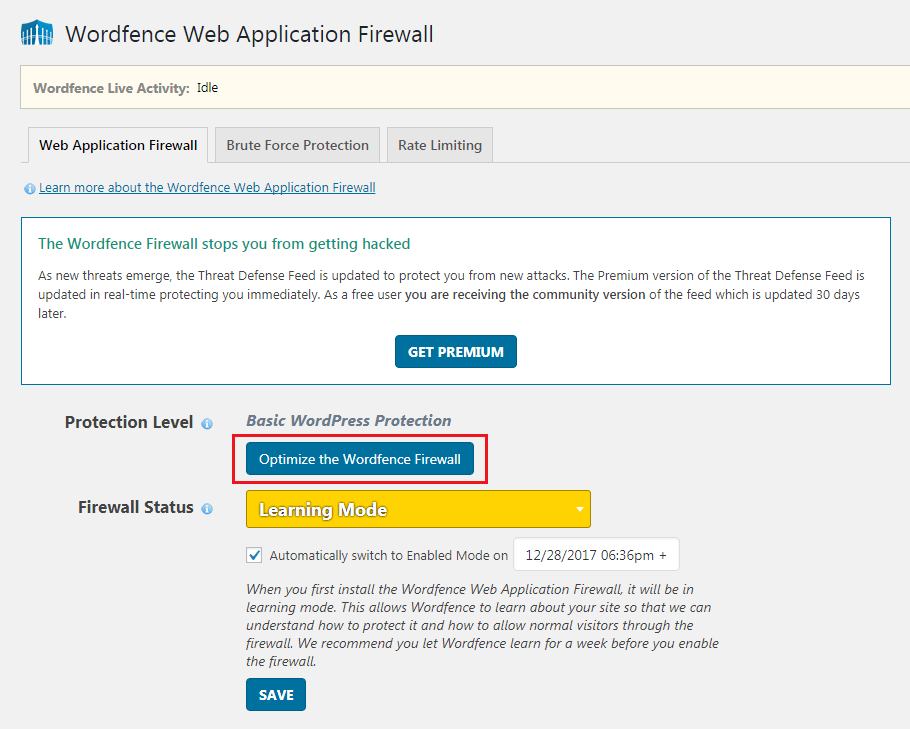
The next option is ‘Firewall’ that’s a web firewall application built-in with Word fence. The Word fence firewall provides two levels of protection, Basic and Extended.
The basic level is already enabled by default which allows the Word fence firewall to run just as a WordPress plugin. Which means, the firewall will load with rest of your WordPress plugins.
With basic firewall, Word fence can protect your Website from several threats. But it will miss out on those threats that are designed to trigger before loading WordPress themes and plugins.
On the other hand, extended firewall allows Wordfence to run before WordPress core, themes, and plugins. Which ensure much better protection against more advanced security threats.

But, if you wonder to see that your server configuration is different from what Word fence has selected. Then, you can select a different one (there is an option available for that).
Now, click on the continue button. Then, Word fence will ask you to download your current .htaccess file as a backup.
So, download .htaccess and after downloading the backup file click on the continue button (Now, it will update your Website’s .htaccess file which will allow it to run before WordPress).

I’m sure, you’ll also notice a ‘Learning Mode’ button. After the first install of Word fence Security plugin, it attempts to learn how you and your users interact with the website to make sure that it doesn’t block legitimate visitors.
In most case, after a week it will automatically switch to ‘Enabled and Protecting’ mode.
Blocking IPs
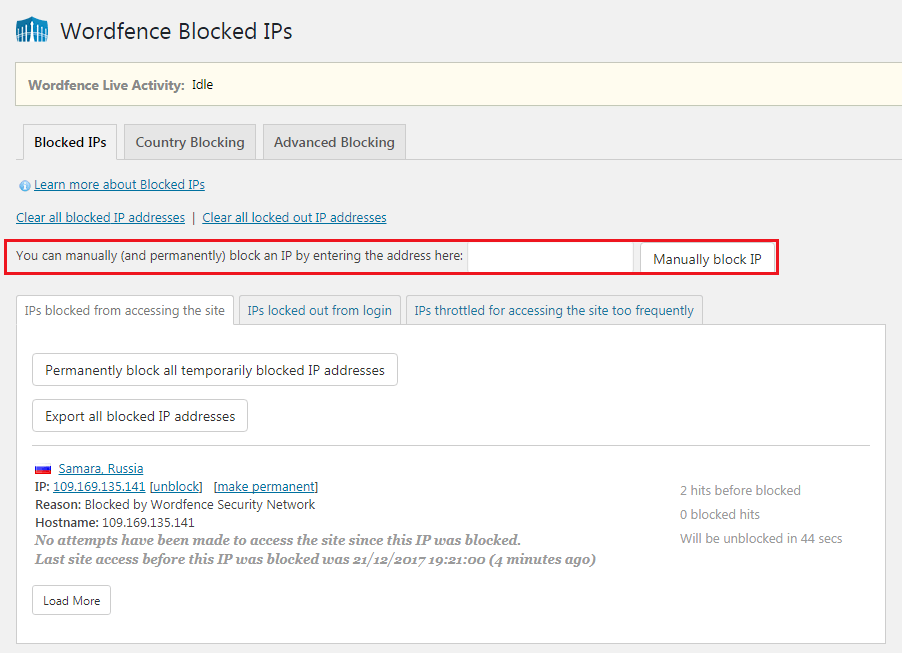
On this page, you can block individual IPs and even full networks! As well as, you can also block suspicious IPs manually.
Real-Time Activity Monitoring
Like other powerful security options, Word fence also show you a very useful log of all requests made to your website. You can view the log on the ‘Live Trafic (Site Activity in Real-Time)’ section.
Essential Security Tools
Having said that Word fence is a powerful security plugin for WordPress Website, and it’s really well said. On the tools section is also contains some essential options that you need to know.
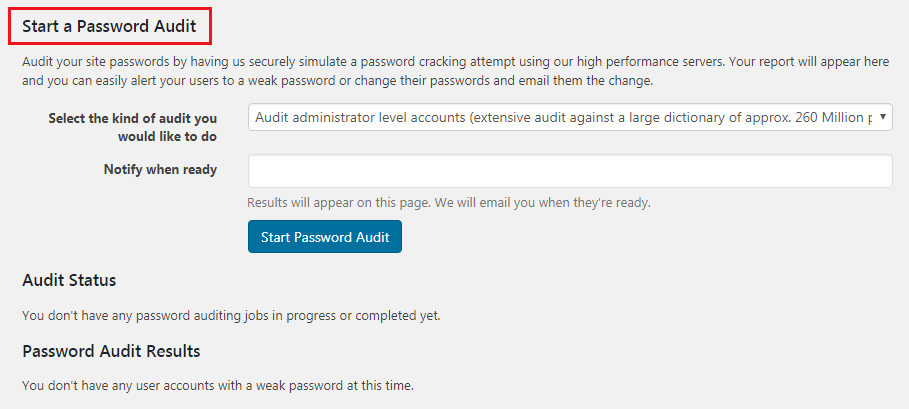
Such as, you can run password audit to ensure that all users on your website are using strong passwords.
As well as, you can also run who is-lookup for suspicious IP addresses and view diagnostics information, which helps debug issues with the plugin or your WordPress site.
With Premium version, Word fence allows users setup two-factor login to strengthen login security on their websites.
Other Security Options
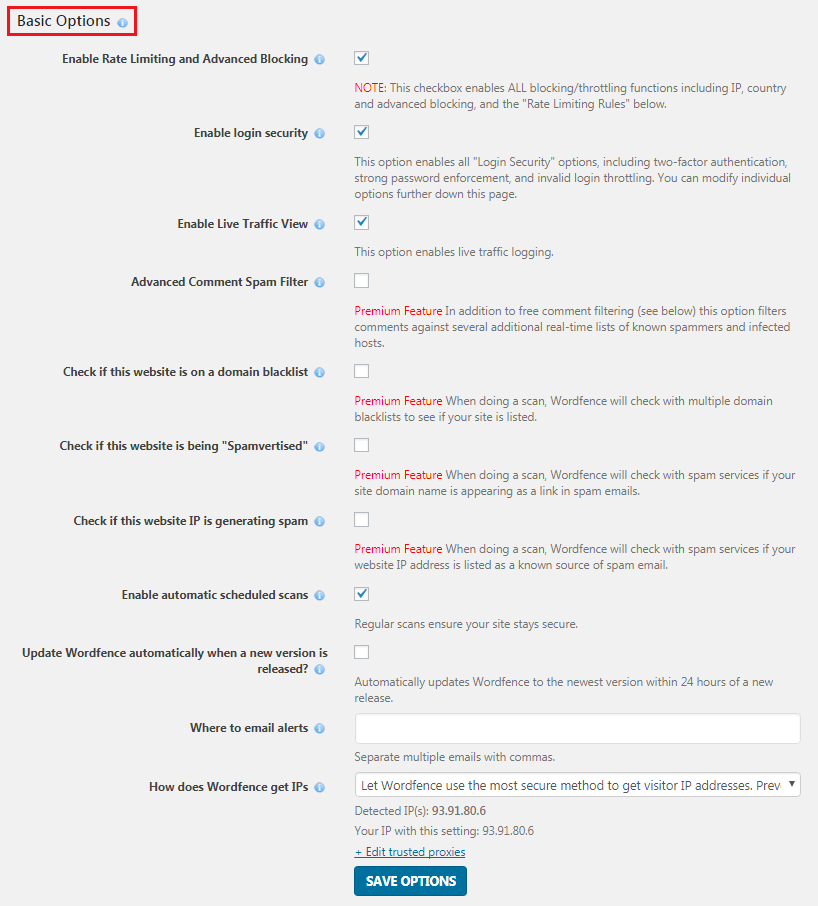
In spite of having top security option, Word fence has also lots of useful options. You can review them form the ‘Options’ section of Word fence menu.
However, the feature’s configuration is well here already. But, you can selectively turn those features on and off. Like, you can also enable or disable limiting login security, email notifications, live traffic view, scans, and other advanced settings.
So, that’s it, finally it’s done!
You will love the following articles:
- How to Add TopBar in Genesis Framework (RainaStudio Map 101)
- How to Add an Audio Sound to Blog’s About Page (RainaStudio Map 101)
- How to Easily Add Slider On Home Page in WordPress
- How to Use Advanced Custom Fields on WordPress
- How to Use Advanced Custom Fields on WordPress
- How to Add MailChimp Subscribe Form to WordPress
- How to Disable Comments on WordPress
- How to Regenerate Custom Thumbnail Image Size
- How to Compress and Optimize Image on WordPress
- How to Add Caching Engine to WordPress Website
- How to Enhance Your WordPress Visual Editor
- How to Add Sitemaps to Google Webmaster
- How to Limit WordPress Login Attempts
- How to Install WordPress Plugin
- How to Create Sitemaps for WordPress Website
- How to Add Google Analytics to WordPress Website
- How to Build an eCommerce Website Using WooCommerce
- How to Add GUTENBERG Visual Editor to WordPress
- How to do WordPress SEO technically (OnPage Guide)
- How to Add a Contact Form to WordPress
- How to STOP Spam Submission on Your Blog
- W3 Total Cache vs WP Super Cache – Which Should You Choose
Wrap Up
I hope, this guide will be helpful for you to protect and keep safe your WordPress website against any suspicious attack, malware, DDOS, etc.
Let me know your feedback about using Wordfence Security by commenting. And, even you’re also most welcome to share your thought about any other WordPress Security plugin that you’ve already used or still using.
Wordfence Security – Firewall, Malware Scan, and Login Security
