‘Gutenberg’ is more than an editor, it’s a kind of visual editor for WordPress. Very soon, this WordPress editor will be integrated into the WordPress core (released with WordPress 5.0).
That means, there is a huge change is coming in WordPress and I think, you should know about Gutenberg if you want to build your website on WordPress.
Every WordPress developers around the world are so curious and active about ‘Gutenberg’ after they first hear about this Visual Editor, as like as I am. Because it could be the end of your well-known WordPress Post Publishing system.
However, it’s still under development now but the beta version of it is available in the WordPress Plugin directory. So, if you want you can install it on your WordPress website to check it.
So, in this article, I’m going to share step by step guide ‘how to add Gutenberg Visual Editor to WordPress‘. But, before that let me tell you a little about ‘Gutenberg’.
What is Gutenberg?
You know, only one thing that sets WordPress apart from other systems is that it allows you to create as rich a post layout as you can imagine – but only if you know about web design, HTML, and CSS and build your own custom theme.
Now, thinking of the editor as a tool which let you write rich posts and create beautiful layouts as you want.
The editor will create a new page- and post-building experience that makes writing rich posts effortless, and has “blocks” to make it easy what today might take shortcodes, custom HTML, or “mystery meat” embed discovery. — Matt Mullenweg (The man behind Gutenberg)
Until now and the moment before you’ll see the review of Gutenberg Visual editor in WordPress Plugin Directory, it may seem it’ll be good.
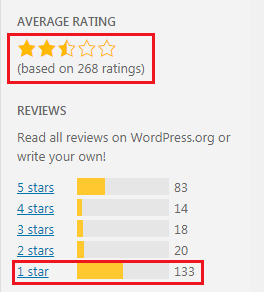
Now, you’ll probably think what are the most WordPress developers and users are thinking about the Gutenberg Visual Editor.
However, it’s getting improved day by day, many issues fixed and still under development, we hope whatever it’s going to happen with WordPress, it’ll be good.
But, according to the running issues, it shouldn’t be integrated into the WordPress Core, just leave it as a Plugin like as others Plugins.
Now, let’s move on to add Gutenberg Visual editor to WordPress.
Adding Gutenberg Visual Editor to WordPress
In the process, at first, you need to install Gutenberg editor. So, let’s start!
Gutenberg Visual Editor Installation & Activation
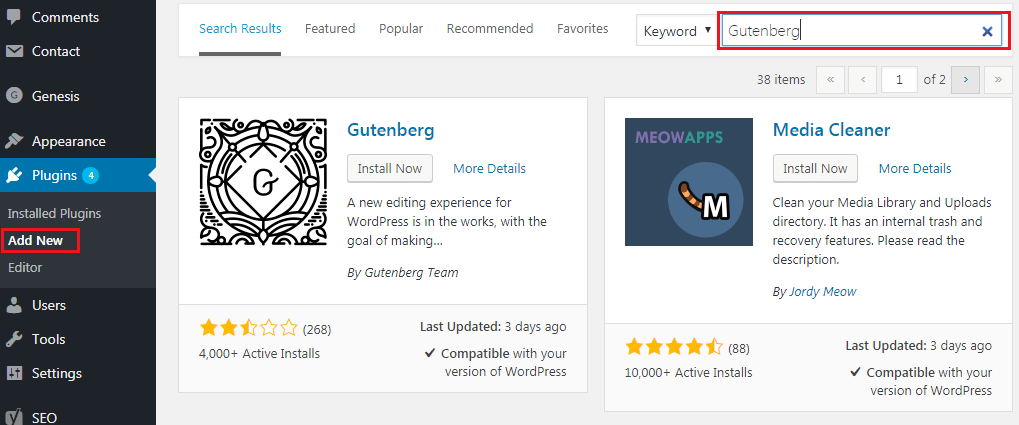
For this, simply go to the ‘Plugin’ section of your WP Dashboard (left-side) and click the ‘Add New’ button. A new window will be opened, now do a search for Gutenberg on the search bar, it’ll come out. Then, install and activate to make it able to use.
That’s it, you’ve successfully added Gutenberg to your WordPress site. Now, let’s try to understand it and its functionality.
Understanding Gutenberg Visual Editor
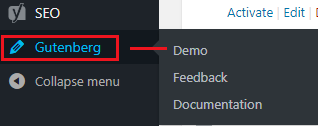
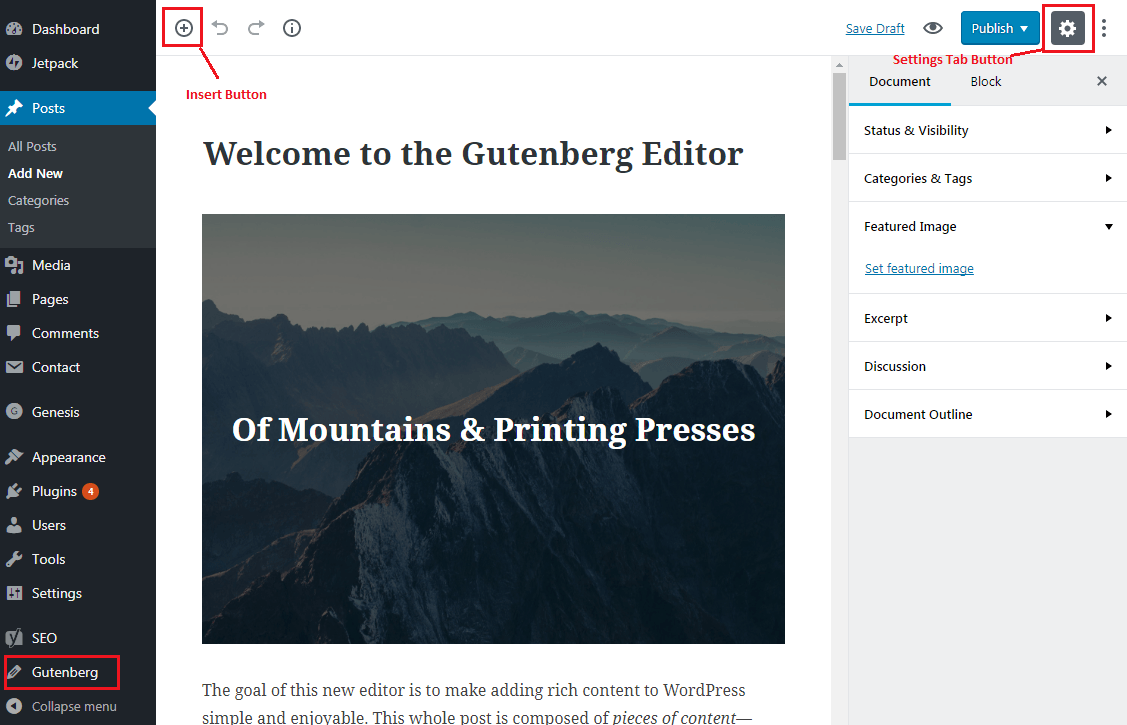
Once, the activation is finished, you can see the ‘Gutenberg’ option on the left side of your WordPress Dashboard (like the image above).
Now, hover over the button and click ‘Demo’, it’ll open a dummy page in the editor like the image below.
This demo page is actually for understanding the functions of this editor. If you’ve already used any other visual editor then it’ll be easy for you to understand easily.
Basic Settings of Gutenberg
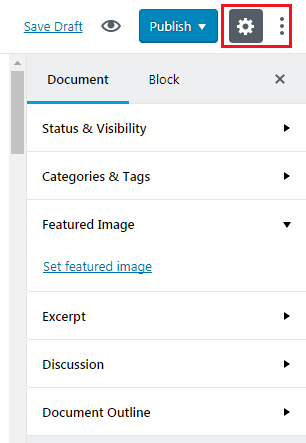
Now, if you take look at the right corner, you can see a Settings Icon, that contains the basic options to check status visibility of a post, to define Categories & Tags, Featured Image option, Discussion and, Document Online.
These options are nearly similar to running WordPress editor’s settings tab. You can make this settings tab hidden and visible as you want by clicking the icon.
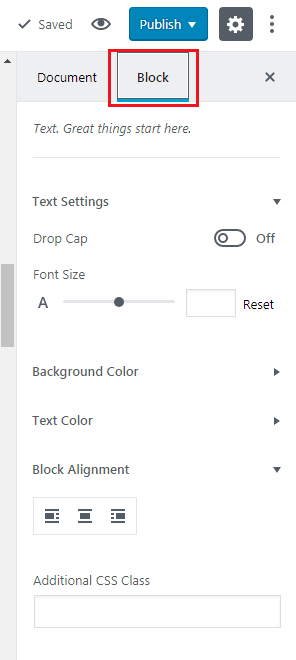
On the settings section another tab is ‘Block’ and there you can see the options such as Drop Cap, Font Size, Background Color, Text Color, Block Alignment, and Additional CSS. That means, after selecting a block you can do this customization.
Insert Options
But, it’s hard at the first time to find out the other essential options, such as adding media, quote, text formatting, etc.
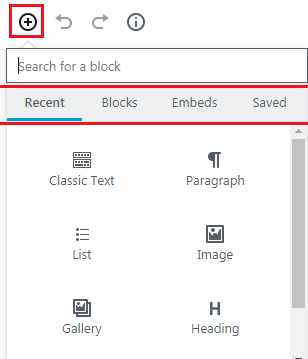
Take a look at the left corner, you can see a plus sign (+), which is the insert option of almost everything inside your post. As you can see like the image above, there are four tabs.
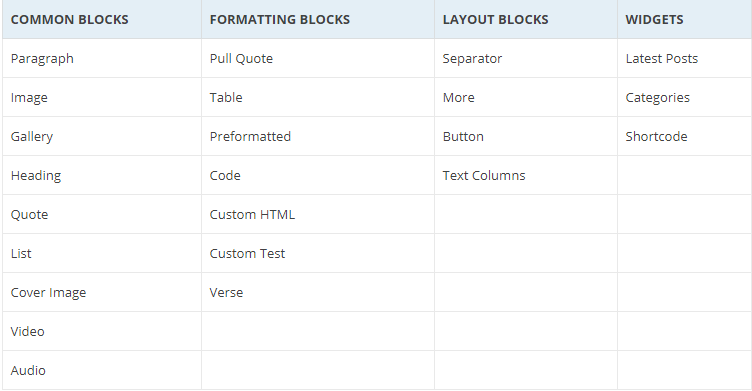
On the recent tabs, you can see the things that you’ve inserted recently. Then, on the blocks tab, you can see all the insertable options. Here below you can see are all the options under ‘Blocks’ tab for inserting.
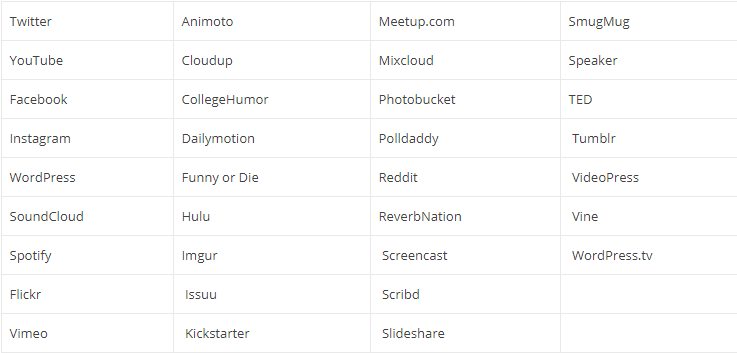
And, when you switch the ‘Embeds’ tab you can see the supported options. Here below are the options you may take a look.
The last tab is saved, which means – you can create your own block and layout to make the content looks as you want.
Visual Blocks
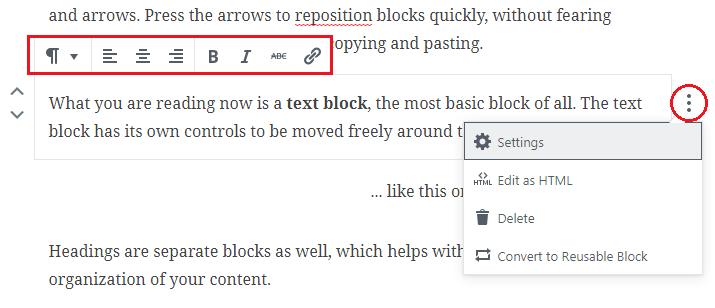
If you take a look at the content – text & images, you can see that they are inside blocks. Every paragraph and image got its own block and between every two of them, you can see the same insert option icon (take a look below).
To find this, click on any block and put the mouse cursor right below the block.
And, if you take look on the right side of a block you can see a sign ( three vertical dots).
If you click the three dots button it’ll open a small tab, where you can see the options to switch ‘Settings’ tab, edit as HTML the elements inside the block, and the purpose to delete the block.
So, these are the main points of Gutenberg Visual Editor that I’ve got to share with you after adding it on my WordPress website.
Wrap Up
This article is a little approach of mine to introduce Gutenberg Visual Editor with all of you, who’re working on WordPress. So, you can add it to your WordPress site, test it and share your thought with us.
Because it’s about the changing of the WordPress Core and like others your feedback is also important to define the fate of our well-known WordPress.
So, give it a shot and share your potential thought with us.
You will love the following articles:
- How to Add TopBar in Genesis Framework (RainaStudio Map 101)
- How to Add an Audio Sound to Blog’s About Page (RainaStudio Map 101)
- How to Easily Add Slider On Home Page in WordPress
- How to Use Advanced Custom Fields on WordPress
- How to Create an Automatic WordPress Backup for Free
- How to Add MailChimp Subscribe Form to WordPress
- How to Disable Comments on WordPress
- How to Regenerate Custom Thumbnail Image Size
- How to Compress and Optimize Image on WordPress
- How to Add Caching Engine to WordPress Website
- How to Enhance Your WordPress Visual Editor
- How to Add Sitemaps to Google Webmaster
- How to Limit WordPress Login Attempts
- How to Secure Your WordPress Website
- How to Create Sitemaps for WordPress Website
- How to Add Google Analytics to WordPress Website
- How to Build an eCommerce Website Using WooCommerce
- How to Install WordPress Plugin
- How to do WordPress SEO technically (OnPage Guide)
- How to Add a Contact Form to WordPress
- How to STOP Spam Submission on Your Blog
- W3 Total Cache vs WP Super Cache – Which Should You Choose
- Thrive Themes vs Genesis Theme Framework: Comprehensive Review
- 15 Reasons You Should Consider Managed WordPress Hosting
- How to Compress and Optimize Image on WordPress
- How to Add Caching Engine to WordPress Website
- How to Choose Best Managed WordPress Hosting
- How to Jetpack Your WordPress Website




One thought on “How to Add GUTENBERG Visual Editor to WordPress”
Hi,
Thanks for sharing this nice and informative blog with us.
You are doing fantastic work keep it up.